CSS: The Definitive Guide, 3rd Edition (38 page)
Read CSS: The Definitive Guide, 3rd Edition Online
Authors: Eric A. Meyer
Tags: #COMPUTERS / Web / Page Design

This may come as a surprise, but it is possible to
apply padding to replaced elements, although there are still limitations at the time
of this writing.
The most surprising case is that you can apply padding to an image, like this:
img {background: silver; padding: 1em;}
Regardless of whether the replaced element is block-level or inline, the padding
will surround its content, and the background color will fill into that padding, as
shown in
Figure 8-45
. You can also see
that padding will push an element's border away from its content.
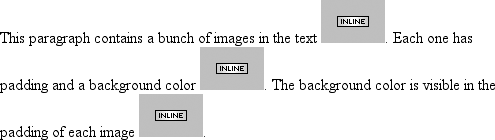
Figure 8-45. Padding replaced elements
As of CSS2.1, however, there was some confusion over what to do about styling form
elements such asinput. It is not entirely clear
where the padding of a checkbox resides, for example. Therefore, as of this writing,
some browsers—such as Mozilla—ignore padding (and other forms of styling) for form
elements. There is hope that a CSS specification will emerge that describes
form-element styling in the future.
The other possible limitation is that many older browsers did not apply padding to
images, including IE5 for Windows.
The ability to apply margins, borders, and padding to any element is one of the
things that sets CSS so far above traditional web markup. In the past, enclosing a
heading in a colored, bordered box meant wrapping the heading in a table, which is a
really bloated and awful way to create such a simple effect. It is this sort of power
that makes CSS so compelling.
Remember the first time you changed the colors of a web page? Instead of the old black
text on a gray background with blue links, all of a sudden you could use any combination of
colors you desired—perhaps light blue text on a black background with lime-green
hyperlinks. From there, it was just a short hop to colored text and, eventually, even to
multiple colors for the text in a page, thanks to
was possible, or so it seemed. CSS takes color and backgrounds even further, letting you
apply many different colors and backgrounds to a single page, and all without a singleFONTorTABLEtag.
When designing a page, you need to plan it out before you
start. That's generally true in any case, but with colors, it's even more so. If you're
going to make all hyperlinks yellow, will they clash with the background color in any
part of your document? If you use too many colors, will it overwhelm the user? (Hint:
yes.) If you change the default hyperlink colors, will users still be able to figure out
where your links are? (For example, if you make both regular text and hyperlink text the
same color, it's much harder to spot links—in fact, almost impossible if the links
aren't underlined.)
Despite the added planning, the ability to change the colors of elements is something
almost every author will want to use, probably quite often. Used properly, colors can
really strengthen the presentation of a document. As an example, let's say you have a
design where allh1elements should be green, mosth2elements should be blue, and all hyperlinks
should be dark red. In some cases, however, you wanth2elements to be dark blue because they're associated with different types
of information. The simplest way to handle this is to assign a class to eachh2that should be dark blue and declare the following:
h1 {color: green;}
h2 {color: blue;}
h2.dkblue {color: navy;}
a {color: maroon;}   /* a good dark red color */
It's actually better to pick class names that describe the type of information
contained within, not the visual effect you're trying to achieve. For example, let's
say that you want dark blue to be applied to allh2elements that are subsection headings. It's preferable to pick a class
name likesubsecor evensub-section, which actually mean something and, more importantly, are
independent of any presentational concepts. After all, you might decide later to make
all subsection titles dark red instead of dark blue, and the statementh2.dkblue {color:maroon;}is more than a little silly.
From this simple example, you can see that it's generally better to plan ahead when
you're using styles, so you can use all of the tools at your disposal. For example,
suppose you add a navigational bar to the page in the preceding example. Within this
bar, hyperlinks should be yellow, not dark red. If the bar is marked with an ID ofnavbar, then you only need to add this rule:
#navbar a {color: yellow;}
This will change the color of hyperlinks within the navigation bar without affecting
other hyperlinks throughout the document.
There is really only one type of color in CSS, and that's a plain, solid color. If
you set thecolorof a document tored, the text will be the same shade of red. HTML works the
same way, of course. When you declaredVLINK="blue">back in the
HTML 3.2 days, you expected all hyperlinks to be the same shade of blue, no matter where
they were in the document.
Don't change that thinking when using CSS. If you use CSS to set thecolorof all hyperlinks (both visited and unvisited) toblue, that's what they'll be. In the same way, if
you use styles to set the background of
thebodytogreen, then the entire body background will be the same
shade of green.
In CSS, you can set both the foreground and background colors of any element, from
thebodydown to emphasis and hyperlink elements, and
almost everything in between—list items, entire lists, headings, table cells, and even
(in a limited fashion) images. To understand how this works, though, it's important to
understand what's in the foreground of
an element and what isn't.
Let's start with the foreground itself; generally speaking, it's the text of an
element, although the foreground also includes the borders around the element. Thus,
there are two ways to directly affect the foreground color of an element: by using thecolorproperty and by setting the border colors
using one of a number of border properties, as discussed in the previous chapter.
The easiest way to set the foreground color of an
element is with the propertycolor.
color
- Values:
| inherit- Initial value:
User agent-specific
- Applies to:
All elements
- Inherited:
Yes
- Computed value:
As specified
As discussed in
Chapter 4
, this property accepts
as a value any valid color type, such as#FFCC00orrgb(100%,80%,0%), as well as the system-color
keywords described in
Chapter 13
.
For nonreplaced elements,colorsets the color of
the text in the element, as illustrated in
Figure
9-1
:
This paragraph has a gray foreground.
This paragraph has the default foreground.

Figure 9-1. Declared color versus default color
In
Figure 9-1
, the default foreground
color is black. That isn't always the case since users might have set their browsers
(or other user agents) to use a different foreground (text) color. If the default
text were set to green, the second paragraph in the preceding example would be green,
not black—but the first paragraph would still be gray.
You need not restrict yourself to such simple operations, of course. There are plenty
of ways to use color. You might have some paragraphs that contain text warning the user
of a potential problem. To make this text stand out, you might decide to color it red.
Simply apply aclassofwarnto each paragraph that contains warning text (
p.warn {color: red;}
In the same document, you might decide that any unvisited links within a warning
paragraph should be green:
p.warn {color: red;}
p.warn a:link {color: green;}
Then you change your mind, deciding that warning text should be dark gray and that
links in such text should be medium gray. The preceding rules need only be changed to
reflect the new values, as illustrated in
Figure
9-2
:
p.warn {color: #666;}
p.warn a:link {color: #AAA;}

Figure 9-2. Changing colors
Another use for color is to draw attention to certain types of text. For example,
boldfaced text is already fairly obvious, but you could give it a different color to
make it stand out even further—let's say,maroon:
b, strong {color: maroon;}
Then you might decide that you want all table cells with a class ofhighlightto contain light yellow text:
td.highlight {color: #FF9;}
Of course, if you don't set a background color for any of your text, you run the risk
that a user's setup won't combine well with your own. For example, if a user has set her
browser's background to a pale yellow, like#FFC,
then the previous rule would generate light yellow text on a pale yellow background.
Therefore, it's generally a good idea to set foreground and background colors together.
(We'll talk about background colors later in the chapter.)
Watch out for color usage in Navigator 4, which replacescolorvalues it doesn't recognize. The replacements aren't exactly
random, but they're certainly not pretty. For example,invalidValuecomes out as a dark blue, andinherit, a valid CSS2 value, will come out as a really awful shade of
yellow-green. In other circumstances,transparentbackgrounds will come out as black.
There are many uses forcolor, the most basic of which is to replace the HTML 3.2BODYattributesTEXT,LINK,ALINK,
andVLINK. With the anchor pseudo-classes,colorcan replace theseBODYattributes outright. The first line in the
following example can be rewritten with the subsequent CSS, and it will have the
result depicted in
Figure 9-3
:
body {color: black;}     /* replacement css */
a:link {color: #808080;}
a:active {color: silver;}
a:visited {color: #333333;}

Figure 9-3. Replacing BODY attributes with CSS
While this may seem like a lot of extra typing, consider two things. First, this
is a major improvement over the old method ofBODYattributes, in which you could make changes only at the document level. Back then, if
you wanted some links to be medium gray and others to be a relatively dark gray, you
couldn't do it with theBODYattributes. Instead,
you'd have to use
every single anchor that needed to be relatively dark. Not so with CSS; now, you can
just add a class to all anchors that need a shade of gray and modify your styles
accordingly:
body {color: black;}
a:link {color: #808080;}      /* medium gray */
a.external:link {color: silver;}
a:active {color: silver;}
a:visited {color: #333;}   /* a very dark gray */
This sets all anchors with aclassofexternalto silver instead of medium gray. They'll still
be a dark gray once they're visited, unless you add a special rule for that as well:
body {color: black;}
a:link {color: #808080;}      /* medium gray */
a.external:link  {color: #666;}
a:active {color: silver;}
a:visited {color: #333;}   /* a very dark gray */
a.external:visited {color: black;}
This will make all external links a dark gray before they're visited and black
after, while all other links will be dark gray when visited and medium gray when
unvisited.
The value ofcolorcan also affect the borders around an element.
Let's assume you've declared these styles, which have the result shown in
Figure 9-4
:
p.aside {color: gray; border-style: solid;}
Figure 9-4. Border colors are taken from the content's color
The element
text and a gray medium-width solid border. This is because the foreground color is
applied to the borders by default. The basic way to override this is with the
propertyborder-color:
p.aside {color: gray; border-style: solid; border-color: black;}
This will make the textgray, but the borders
will beblack. Any value set forborder-colorwill always override the value ofcolor.
The borders, incidentally, allow you to affect the foreground color of
images.
Since images are already composed of colors, you can't really affect them usingcolor, but you can change the color of any
border around the image. This can be done using eithercolororborder-color. Therefore, the
following rules will have the same visual effect on images of classtype1andtype2, as shown in
Figure 9-5
:
img.type1 {color: gray; border-style: solid;}
img.type2 {border-color: gray; border-style: solid;}

Figure 9-5. Setting the border color for images
Setting a value forcolorshould (in theory, anyway) apply to form elements. Declaringselectelements to have dark gray text should
be as simple as this:
select {color: rgb(33%,33%,33%);}
This might also set the color of
the borders around the edge of theselectelement, or it might not. It all depends on the
user agent and its default styles.
You could also set the foreground color ofinputelements, although, as you can see in
Figure 9-6
, doing so would apply that color
to all inputs, from text to radio button to checkbox inputs:
select {color: rgb(33%,33%,33%);}
input {color: gray;}
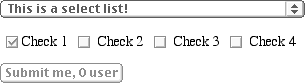
Figure 9-6. Changing form element foregrounds
Note in
Figure 9-6
that the text color
next to the checkboxes is still black. This is because you've assigned styles only to
elements likeinputandselect, not normal paragraph (or other) text.
CSS1 offered no way to distinguish between different types ofinputelements. So, if you wanted checkboxes to be a
different color than radio buttons, you had to assign them classes to get the desired
result:
input.radio {color: #666;}
input.check {color: #CCC;}
In CSS2 and later, it's a little easier to distinguish between different elements
based on which attributes they have, thanks to attribute selectors:
input[type="radio"] {color: #333;}
input[type="checkbox"] {color: #666;}
Attribute selectors allow you to dispense with the classes altogether, at least in
this instance. Unfortunately, many user agents don't support attribute selectors, so
the use of classes may be necessary for a while.
Navigator 4 won't apply colors to form elements, but setting the colors for
form elements works in Internet Explorer 4 and up, and Opera 3.5+. However, many
versions of other browsers don't allow form-element styling either, due to
uncertainty over how they should be styled.