CSS: The Definitive Guide, 3rd Edition (34 page)
Read CSS: The Definitive Guide, 3rd Edition Online
Authors: Eric A. Meyer
Tags: #COMPUTERS / Web / Page Design

Margins can also be applied to inline
elements, although
the effects are a little different. Let's say you want to set top and bottom margins
on strongly emphasized text:
strong {margin-top: 25px; margin-bottom: 50px;}
This is allowed in the specification, but since you're applying the margins to an
inline nonreplaced element, it will have absolutely no effect on the line height.
Because margins are effectively transparent, this declaration will have no visual
effect whatsoever. This happens because margins on inline nonreplaced elements don't
change the line height of an element.
The only properties that can change the distance between lines containing only
text areline-height,font-size, andvertical-align, as
described in
Chapter 7
.
These facts are true only for the top and bottom sides of inline nonreplaced
elements; the left and right sides are a different story altogether. We'll start by
considering the simple case of a small inline nonreplaced element within a single
line. Here, if you set values for the left or right margin, they will be visible, as
Figure 8-15
makes clear (so to speak):
strong {margin-left: 25px; background: silver;}

Figure 8-15. An inline nonreplaced element with a left margin
Note the extra space between the end of the word just before the inline
nonreplaced element and the edge of the inline element's background. You can add that
extra space to both ends of the inline if you want:
strong {margin: 25px; background: silver;}
As expected,
Figure 8-16
shows a
little extra space on the right and left sides of the inline element, and no extra
space above or below it.

Figure 8-16. An inline nonreplaced element with a 25-pixel margin
Now, when an inline nonreplaced element stretches across multiple lines, the
situation changes a bit.
Figure 8-17
demonstrates what happens when an inline nonreplaced element with a margin is
displayed across multiple lines:
strong {margin: 25px; background: silver;}

Figure 8-17. An inline nonreplaced element with a 25-pixel margin displayed across two
lines of text
The left margin is applied to the beginning of the element and the right margin to
the end of it. Margins are
not
applied to the right and left
side of each line. Also, you can see that, if not for the margins, the line may have
broken after "text" instead of after "strongly emphasized." Margins only affect line
breaking by changing the point at which the element's content begins within a line.
The situation gets even more interesting when we apply negative margins to inline
nonreplaced elements. The top and bottom of the element aren't affected, and neither
are the heights of lines, but the left and right ends of the element can overlap
other content, as depicted in
Figure
8-18
:
strong {margin: -25px; background: silver;}

Figure 8-18. An inline nonreplaced element with a negative margin
Replaced elements represent yet another story: margins set for them
do
affect the height of a line, either increasing or reducing it
depending on the value for the top and bottom margin. The left and right margins of
an inline
replaced element act the same as for a nonreplaced element.
Figure 8-19
shows a series of different
effects on layout from margins set on inline replaced elements.

Figure 8-19. Inline replaced elements with differing margin values
Historical Margin Problems
As useful as margins are, a number of problems can arise from their use—all of
them centered on Netscape Navigator 4.x (NN4.x), unsurprisingly.
The first hitch is that Navigator 4.x
added
margin rules
to its default margins instead of replacing its default values. For example,
consider:
h1 {margin-bottom: 0;}
p {margin-top: 0;}
NN4.x displays the elements with the usual blank space between them because
it's adding the zero values to its own default margins. If you want to override
this space, you can always use negative margins, such as setting a-1emtop margin on the paragraph. The problem with
this solution is that it won't work universally. A CSS-conformant browser will
then overlap the text, since it replaces the top margin of the paragraph.
The problem gets worse, unfortunately. If you apply margins to inline elements,
your layout will more or less shatter. NN4.x assumes that a margin on any element,
inline or not, refers to the left edge of the browser window. This is utterly,
completely wrong. Unfortunately, if you have a lot of NN4.x visitors, the use of
margins on inline elements is a very risky proposition and not one to be taken
lightly. Fortunately, it's easy to hide CSS from NN4.x so that you can style your
documents without worrying about NN4.x destroying them. Assuming you still worry
about the page's appearance in NN4.x, of course.
Inside the margins of an element are its
borders
.
The border of an element
is simply one or more lines that surround the content and padding of an element. Thus,
the background of the element will stop at the outer border edge, since the background
does not extend into the margins, and the border is just inside the margin.
Every border has three aspects: its width, or thickness; its style, or appearance;
and its color. The default value for the width of
a border ismedium,
which is not explicitly defined but is usually two pixels. Despite this, the reason you
don't usually see borders is that the default style isnone, which prevents them from existing. If a border has no style, it doesn't
need to exist. (This lack of existence can also reset the width value, but we'll get to
that in a little while.)
Finally, the default border color is the foreground color of
the element
itself. If no color has been declared for the border, it will be the same color as the
text of the element. If, on the other hand, an element has no text—let's say it has a
table that contains only images—the border color for that table will be the text color
of its parent element (due to the fact that color is inherited). That element is likely
to bebody,div,
or anothertable. Thus, if atablehas a border, and thebodyis its
parent, given this rule:
body {color: purple;}
by default, the border around thetablewill be
purple (assuming the user agent doesn't set a color for tables). Of course, to get that
border to appear, you have to do a little work first.
The CSS specification strongly implies that the
background of an element extends to the outside edge of the border, since it mentions
borders being drawn "on top of the background of the element." This is important
because some borders are "intermittent"—for example, dotted and dashed borders—and
the element's background should appear in the spaces between the visible portions of
the border.
When CSS2 was released, it stated that the background extends only into the
padding, not the borders. This was later corrected, and CSS2.1 explicitly states that
the element's background is the background of the content, padding, and border areas.
Most browsers are in agreement with the CSS2.1 definition, although some older
browsers may act differently. Background color issues are discussed in more detail in
Chapter 9
.
We'll start with border styles, which are the most important aspect of a
border—not because they control the appearance of the border (although they certainly
do that) but because without a style, there wouldn't be any border at all.
CSS defines 10 distinct non-inheritstyles for
the propertyborder-style, including the default
value ofnone. The styles are demonstrated in
Figure 8-20
.
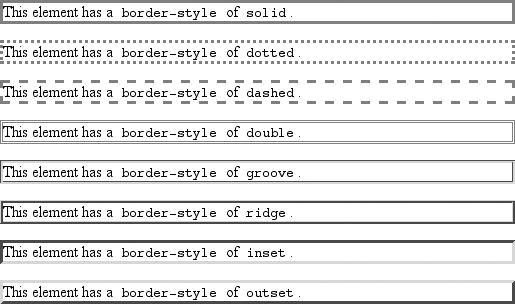
Figure 8-20. Border styles
The style valuehiddenis equivalent tonone, except when applied to tables, where it's
used for border-conflict resolution. (See
Chapter
11
for more details.)
border-style
- Values:
[
none|hidden|dotted|dashed|solid|double|groove|ridge|inset|outset]{1,4} |inherit- Initial value:
Not defined for shorthand properties
- Applies to:
All elements
- Inherited:
No
- Computed value:
See individual properties (
border-top-style, etc.)- Note:
According to CSS1 and CSS2, HTML user agents are only required to
supportsolidandnone; the rest of the values (except forhidden) may be interpreted assolid; this restriction was dropped
in later drafts of CSS2.1
The most unpredictable border style isdouble.
It's defined such that the width of the two lines, plus the width of the space
between them, is equal to the value ofborder-width(discussed in the next section). However, the CSS
specification doesn't say whether one of the lines should be thicker than the other,
or if they should be the same width, or if the space should be thicker or thinner
than the lines. All of these things are decided by the user agent, and the author has
no way to influence the decision.
All of the borders shown in
Figure
8-20
are based on acolorvalue ofgray, which makes the visual effects easier to see. The
look of a border style is always based in some way on the color of the border,
although the exact method may vary between user agents. For example,
Figure 8-21
illustrates two different ways
of rendering aninsetborder.

Figure 8-21. Two valid ways of rendering inset
So let's assume you want to define a border style for images that are inside any
unvisited hyperlink. You might make themoutset,
so they have a "raised button" look, as depicted in
Figure 8-22
:
a:link img {border-style: outset;}

Figure 8-22. Applying an outset border to a hyperlinked image
Again, the color of
the border is based on the element's value forcolor. In this circumstance, that value is likely to be
blue (although it won't show in print) because the image is contained with a
hyperlink, and the foreground color of hyperlinks is usuallyblue. If you so desired, you could change that color tosilver, like this:
a:link img {border-style: outset; color: silver;}
The border will now be based on the light-grayishsilver, since that's now the foreground color of the image—even though the
image doesn't actually use it, it's still passed on to the border. We'll talk about
another way to change border colors later in this chapter.
styles
It's
possible to define more than one style for a given border. For
example:
p.aside {border-style: solid dashed dotted solid;}
The
result is a paragraph with a solid top border, a dashed right border, a dotted
bottom border, and a solid left border.
Again we see the
top-right-bottom-left order of values, just as we saw in our discussion of setting
different margins with multiple values. All of the same rules about value
replication apply to border styles, as they did with margins and padding. Thus,
the following two statements would have the same effect, which is depicted in
Figure
8-23
:
p.new1 {border-style: solid dashed none;}
p.new2 {border-style: solid dashed none dashed;}
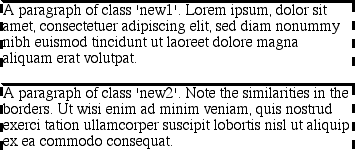
Figure 8-23. Equivalent style rules
styles
There may be times
when you want to set border styles for just one side of an element box, rather
than all four. That's where the single-side border style properties come
in.
border-top-style, border-right-style, border-bottom-style,
border-left-style
- Values:
none|hidden|dotted|dashed|solid|double|groove|ridge|inset|outset|inherit- Initial value:
none- Applies to:
All elements
- Inherited:
No
- Computed value:
As specified
Single-side border style properties are fairly self-explanatory. If
you want to change the style for the bottom border, for example, you useborder-bottom-style.
It's not uncommon to
seeborderused in conjunction with a
single-side property. Suppose you want to set a solid border on three sides of a
heading, but not have a left border at all, as shown in
Figure 8-24
.

Figure 8-24. Removing the left border
There are two equivalent ways to accomplish
this:
h1 {border-style: solid solid solid none;}
/* the method above is the same as the one below */
h1 {border-style: solid; border-left-style: none;}
What's
important to remember is that if you're going to use the second approach, you must
place the single-side property after the shorthand, as is usually the case with
shorthands. This is becauseborder-style:solidis actually a declaration ofborder-style:solid solid. If you put
solid solidborder-style-left:nonebefore theborder-styledeclaration, the shorthand's
value will override the single-side valuenone.
You may have noticed that, so far, your border
examples have used borders of exactly the same width. This is because you didn't
define a width, so it defaulted to a certain value. Next, you'll find out about
that default, and much more.