125 Physics Projects for the Evil Genius (42 page)
Read 125 Physics Projects for the Evil Genius Online
Authors: Jerry Silver

Overall, you are going to set up two identical parts of the apparatus, shown in
Figure 71-1
, connected together electrically. To do this, follow these steps:
- Suspend each of the two springs to the supports.
- Attach the two bar magnets to the bottom of the springs using string or wire.
- Position the bar magnets, so when the spring is displaced downward, the magnet extends into the coil, but it does not touch the table the coils are sitting on.
- Start with both springs hanging.
- Displace one spring to set it oscillating, but leave the other spring hanging undisturbed. Observe the result.
Initially, the first magnet, after being set in motion, goes up and down by itself. The motion of the first magnet generates an electrical current that causes the second magnet/spring combination to start to oscillate.
The first magnet moving through the coil generates a current. This current is transmitted to the second coil. The current flowing in the second coil exerts a force on the second magnet, which sets it in motion. Because both springs are a matched set with nearly identical spring constants, the frequency of the electrical signal driving the second spring is at its resonant frequency. A small driving force at the resonant frequency has a much greater impact than a force at any other frequency.
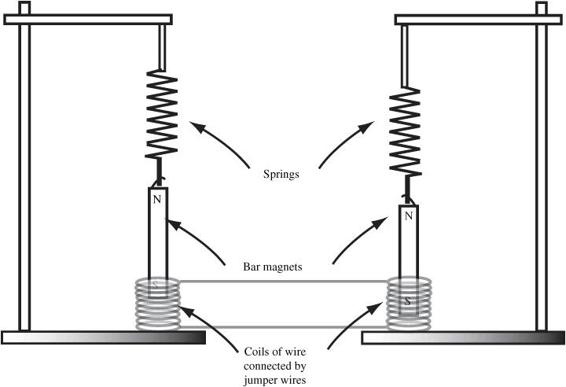
Figure 71-1
The movement of one spring causes the other one to resonate
.
If you want to push your luck, you can put an LED in the electrical circuit. LEDs conduct current in only one direction. A pair of LEDs, each oriented in the opposite direction and connected in parallel, would be needed to prevent blocking the current flow. You can also put a galvanometer or a current sensor in series with one of the wires and measure the current flow directly.
Another simple way to show oscillation between magnets is to suspend two magnets horizontally from springs. Start with the north pole of one magnet facing the south pole of the other magnet. Then, turn each of the magnets from that equilibrium line. They can be turned through an angle in the same or opposing directions. The magnets will move to bring themselves back to that equilibrium position. But they will overshoot and keep going until their energy is lost to friction. Until then, they form a simple harmonic oscillator. Try this with different starting angles.
A magnet moving in a coil of wire generates an electrical current.
An electrical current moving in a wire exerts a force on a magnet.
A simple harmonic oscillator (in this case, the spring) resonates if driven at its resonant frequency.
Speed of sound. Timing an echo old school. Why Galileo couldn’t do this with light
.
The speed of sound, like any other sound, can be found by measuring the time it takes to go a certain distance. This simple and straightforward measurement can give a reasonable ballpark estimate, but not highly accurate results. We will, however, be limited by the large distances we need to work with and the small times we need to accurately measure. We measure the speed of sound using a more accurate method in the following projects.
- long tape measure (or some other way to
estimate
a long distance, such as counting cinder blocks of a known length on a building or clocking the distance of several blocks using the odometer of a car) - means of generating a loud sound (such as an air horn, garbage-can lid, or baseball bat, or someone with a loud voice)
- stopwatch
- partner (which may not be needed if you can set up an echo)
- Measure or estimate a course of known or estimated distance without visual obstruction. A football field or possibly multiple lengths can work. You can also use a building or natural geographic feature, such as a cliff to reflect an echo. This effectively doubles the distance the sound travels.
- Generate the sound and note the difference in time between when the sound was generated and when it is heard at a distant location. (This can be accomplished by observing when the garbage-can lid was struck or observing at a distance when the air horn is sounded.)
- To get the speed of sound, divide the distance by the time. See
Figure 72-1
.
The speed of sound is about 343 meters per second or about 1096 feet per second at 20°C. It is unlikely this technique will give an accurate value for the speed of sound, but it should provide a ballpark estimate.

Figure 72-1
Measuring the velocity of sound directly
.
Velocity is distance divided by time. Because the speed of light is so much greater than the speed of sound, the time it takes light to travel the distance can be considered essentially zero and is insignificant compared to the speed of sound.
Note that Galileo tried to measure the speed of light using a similar method. Light moves so quickly, however, it requires extremely large distances to measure the time it takes to travel using a stopwatch. Rather than saying that Galileo failed in his attempt, we like to say he succeeded in proving that light was much faster than he could measure.
The distance to a lightning strike can be determined by counting the number of seconds between seeing the lighting and hearing the thunder. Using a known value for the speed of sound multiplied by time can provide an estimate of the distance to the lightning strike. Similarly, the speed of sound can be determined if the distance to the lightning strike is known (or can be measured, such as by driving to where the lightning was observed to hit) and divided by the time between seeing the lightning and hearing the thunder.
Speed is distance divided by time. However, the accuracy of any experiment is limited by the resolution of the least certain measurement. Even if distance can be measured accurately, the time measurements are limited by the reaction time of the observer.
Speed of sound. Resonance in a cylinder
.
In this experiment, we measure the speed of sound based on the resonance that a tuning fork produces over a column of water in a cylinder. Unlike the very direct approach of the previous section, we take advantage of the wave properties of sound to make a much more accurate measurement.
- tuning fork of known frequency
- rubber mallet
- closed watertight cylinder (about 15–20 cm tall)—a 1–2 L graduated cylinder will work
- ruler
- 200 mL beaker (or other container with a spout to pour water into the graduated cylinder)
- water
- quiet room
1. Strike the tuning fork with the rubber mallet. Hitting the tuning fork on a hard surface may result in altering its frequency.
2. Hold the ringing tuning fork over the top of the graduated cylinder, as indicated in
Figure 73-1
.
3. Place your ear near the top of the graduated cylinder and listen to the sound of the tuning fork.
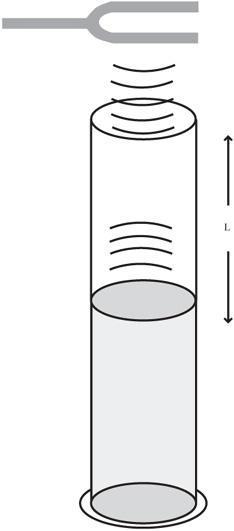
Figure 73-1
Finding the column length that results in resonance at a particular frequency
.
4. Slowly add water to the cylinder and continue to listen. This can be a several-person operation. Be careful not to cause the water to splash, which can distract the listener from hearing the sound of the tuning fork.
5. At a certain height, as the water level is raised, the sound of the tuning fork becomes markedly louder. You may need to listen carefully to hear it.
6. Once you think you found the resonance, pour out some of the water and confirm that the sound level for the tuning fork becomes lower, and then gets louder again as the water level is brought back up. It should also get lower as the water level is raised above the resonance level. (If you miss the first resonance, continue adding water andyou will hear the second resonance. Using the wavelength for the second resonance will result in a speed of sound that is half the correct value.)
7. Determine the frequency of the tuning fork, either by noticing the marking on the tuning fork or by measuring it. You can use an instrument tuner to measure or verify the frequency of the tuning fork.
8. Calculate the speed of sound using this equation:
v = 4 Lf
where
L
is the length of the air column above the water and
f
is the frequency marked on the tuning fork.
9. A more exact expression which accounts for the node of the sound wave not being exactly at the opening of the tube of diameter,
d
, is:
Expected Resultsv = 4f(L + 0.4d)
The accepted value for the speed of sound at 20°C is 343 m/s. The warmer the air, the faster the speed of sound, according to the equation v = 331 m/s + 0.6 T where
T
is the temperature in degrees centigrade.
To get an idea of the appropriate height needed in the resonant air column for various common tuning forks, you can check the following table. These values do not include the correction factor used in the experiment to account for the diameter of the cylinder. It is possible that someone doing this experiment may not notice the resonance of the fundamental frequency and will continue filling the graduated cylinder until arriving at the resonance for the second harmonic.
Table 73-1
serves as a guide to find the column height that produces a resonant frequency.
The resonance occurs when the length of the column produces a natural resonance that is the same as the tuning fork.
Table 73-1
