125 Physics Projects for the Evil Genius (37 page)
Read 125 Physics Projects for the Evil Genius Online
Authors: Jerry Silver

Energy is conserved. An object has potential energy because it is a certain distance above the ground. As it rolls down an incline, some of its energy changes into kinetic energy
- aluminum track used to secure shelving in bookcases. This is the type hung vertically on the sides of the bookshelf and holds clips that support the shelves. This track should be flexible enough so you can bend it to form a circular shape. (You don’t want the heavy-duty shelving tracks you would use to set up a bookshelf to hold all your physics textbooks.)
- 1 marble or steel ball that smoothly rolls in the track
- circular object to use a guide, such as a small bucket or a one gallon paint can
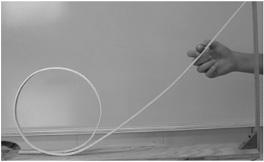
Figure 63-1
Where must the ball be positioned to make it around the loop without falling
?
- frame to mount the frame on
– incline (2 feet long × 3 inches wide × ¾ inch thick will do fine)
– bottom 3 feet × 3 inches × ¾ inches
– vertical brace 1 foot × 3 inches × ¾ inch
– small right-angle bracket to support the vertical brace
- you may want to add some kind of net to catch the marble at the end, so you don’t have to chase it every time
- small flat-head wood screws—the smaller the better, but just larger than the screw holes in the track
- a meterstick
This apparatus is also commercially available, as shown in
Figure 63-2
.
1. Assemble the frame by attaching the pieces of wood, as shown.
2. Form a circular loop by carefully bending the track around the form. Note, the channel should be toward the inside of the circle when you do this.
3. Predrill holes for the wood screws in the wood using a drill bit a size or two smaller than your screws.
4. Secure the loop to the frame using the wood screws. It is important that the (flat) heads of the woods screws do not interfere with the motion of the ball. If you find your wood screw protrudes into the path of the marble, you can work around this by enlarging the holes or by countersinking the holes in the track, so the screw head is flush with the bottom of the track.

Figure 63-2
Courtesy PASCO
.
5. Align the track as shown in
Figure 63-1
. The loop should be as symmetrical as possible with the overall path making a vertical loop. Also, make enough separation between the part of the track going into and out of the loop, so there is enough clearance between the marble and the track.
Testing it6. You can (optionally) attach some kind of catcher (a net or cup) to avoid chasing marbles.
1. Take a guess as to where the marble must be placed to negotiate the loop. Here are some choices: a) equal to the radius, b) equal to the diameter, c) greater than the diameter, or d) twice the diameter. (Take into account there will be some friction.)
2. Pick your starting point and observe what happens. Find the minimum point to consistently negotiate one loop. What happens to the marble if you release it at a point that is higher or lower than this minimum point? See
Figure 63-1
.

Figure 63-3
Courtesy PASCO
.
With a low-friction sliding object car, such as a cart with wheels or a roller coaster car, the height must be at least 2.5 times the radius of the loop. Actual loops require slightly greater height to overcome friction.
For rolling objects, such as a steel ball or marble, some of the potential energy is tied up in rolling, so the height must be at least 2.7 times the radius of the loop (again, without accounting for frictional losses).
The potential energy you start with (by raising it to certain height on the track) is changed into kinetic energy. The higher your release point, the faster it goes. If the object is rolling rather than sliding, some of the potential energy is used to get the object rolling. If there is friction along the way, some additional potential energy is consumed.
To negotiate the loop, the centripetal force (provided by the track to maintain a circular path) must just equal the force of gravity. With less velocity, it will fall before completing the loop. With extra velocity, it will get through with some energy to spare.
Now that you have one loop down, you can try a similar track with more than one loop. You still only need one ramp to give the marble an initial velocity.
Total mechanical energy is conserved. Potential energy is converted to kinetic energy and vice versa.
Sound and Waves
What does sound look like? Oscilloscope wave forms
.
What does your voiceprint look like? You cannot see sound. But you can change the sound waves into electrical signals that can be displayed on a screen. Just as you found ways to visualize motion and to represent motion using various graphs, in this section you develop techniques to visually represent waves. This can enable you to study basic wave properties and to observe how waves combine to form new patterns.
You can go about this in two ways. One way is to use an oscilloscope, which is an instrument that takes an electrical signal and displays it in graphical form. Recently, a much lower cost alternative has become available that makes it possible to turn a computer into an oscilloscope.
This project focuses on how either type of oscilloscope can be used to study the wave properties of sound.
- oscilloscopes, which range in cost from just under $600 to thousands of dollars
- sound card oscilloscope. You can turn your computer into a oscilloscope in several ways:
– PC sound card distributed for private and noncommercial use in educational institutions at
www.zeinitz.de/Christian/Scope_en.html
. (Oscilloscope images shown in this and other sections are based on this sound card oscilloscope and appear courtesy of C. Zeinitz.)
– Zelscope is available for a small charge at
www.zelscope.com
(this used to be called Winscope).
- tuning fork
- adapters
– To connect microphone to computer. Microphones are either high- or low-impedance connections and the computer input is typically a mini.
– Microphone output to oscilloscope input (typically BNC connector).
– Depending specifically on what connections you need to make, you can most likely find connectors at Radio Shack or build the connector you need.
– Caution: Sound card oscilloscopes can handle only low-voltage inputs, such as from microphones. Attempting to use a sound card oscilloscope for larger electrical signal may damage your sound card. A reference for how to assemble a high-impedance circuit that can enable using a sound card oscilloscope for higher voltages is given in
Project 115
.
- wave generator
– stand-alone device designed for this purpose
– keyboard with appropriate connectors
Method– waveform generator available with some computer oscilloscopes
- Connect the microphone to the oscilloscope input.
- Collect a test signal, such as your voice or a musical sound.
- Adjust the vertical scale, so the entire wave is displayed.
- Adjust the horizontal (time) scale, so the wave is displayed.
- If necessary, adjust the trigger to enable the wave to be properly displayed. (Chose continuous rather than single-event settings for the trigger.)
- Generate a pitch audibly with a tuning fork, a keyboard synthesizer, or by a waveform generator. (Depending on your setup, you can use the waveform generator to produce an audible signal through a loudspeaker or send it directly into the input of the oscilloscope.)
- Increase the pitch (frequency) and compare to the previous shape.
- Decrease the pitch and compare to the previous measurements.
- Increase the volume (amplitude) of the sound and observe how the wave changes.
- Try your voice using the microphone. How does that compare to a pure tone, such as produced by the tuning fork?
- Observe different waveform shapes, such as sinusoidal, triangular, square wave, and sawtooth. How do they sound? What musical instruments do each of the previous waveforms most closely resemble?
- Play various musical instruments and identify fundamental waveforms that appear to be present in the instruments’ waveforms.
- Just for fun: Observe various samples of music. Can you distinguish various musical styles just by looking at the waveform?
- Can you recognize the “voice signature” of different people as crime labs do all the time on TV?
- Generate a tone or frequency. Let’s say we start with 440 hertz (Hz), a concert A. Display this on Channel 1.
- Generate a second tone or frequency. Let’s say we use 100 Hz. Display this on Channel 2.
- Many oscilloscopes let you display two signals on one display. If your oscilloscope has the capability to display two inputs on one display, show the combined signals from 1 and 2. How does the combined signal compare to the two individual signals?
- You can also accomplish this by generating two audible tones at the same time, such as playing two notes on a keyboard synthesizer at the same time. Sounding two tuning forks at the same time will also work.
Increased pitch shows up on the oscilloscope as increased frequency.
Increased volume is displayed as increased amplitude.
A tuning fork or a wave generator produces a pure sine wave.
Figure 64-1
shows the relatively pure sine wave pattern produced by the flute setting of an electronic synthesizer playing a 440 Hz tone.
Sawtooth and triangular waves sound more “reedy,” like a clarinet or saxophone.