The Home Creamery (5 page)
Authors: Kathy Farrell-Kingsley

Note:
Using slightly ripened cream to make butter gives it a more complex flavor. To ripen cream, leave it at room temperature for 12 to 24 hours, or until it starts to look shiny and tastes a bit acidic. Do not let it set out longer than 24 hours, or it will become sour-tasting.
BUTTER STORAGE
Fresh butter should be kept in a covered dish and refrigerated up to several weeks. For longer storage, double wrap the butter with plastic wrap and freeze up to 9 months.
HOMEMADE BUTTER
METHOD 2
INGREDIENTS
1 cup heavy cream
at 60°F
¼ teaspoon salt
This method is so easy, demonstrating how simple it is to make butter. All you need is cream and a jar. The only variable here is the quality of the cream you use; the better the cream, the better-tasting the butter.
1.
Pour the cream into a clean, pint jar with a tight-fitting lid. Screw on the lid and shake the jar until the butterfat becomes solid and separates from the liquid, 15 to 20 minutes.
MAKES ABOUT ½ CUP
PREP TIME: 45 MINUTES
2.
Pour off the buttermilk and save for another use. Rinse the butter by adding a little cold water to the solid butterfat in the jar and shaking it again. Do this several times until the rinse water runs clear. Drain off the liquid.

3.
Turn the butter into a medium bowl and knead with a wooden spoon, potato masher, or two forks to remove any excess liquid and blend solids. Pour off the liquid occasionally until most of it has been removed. Mix in salt. Keep working the butter until all the solids have blended together and all liquid has been worked out, about 15 minutes.
BUTTER TROUBLESHOOTING
IF YOU ARE UNABLE TO FORM BUTTER SOLIDS …
• The cream did not have a high enough butterfat content. For making butter, be sure to use heavy cream with a fat content between 36 and 40 percent.
• The cream was not cold enough when you began working with it. If the cream is too warm, the butter solids may not firm up properly.
PIIMA BUTTER
Piima (pee-ma) is a culture based on the extract of the butterwort plant.
Some sources suggest that using piima to make dairy products originated in Scandinavia when farmers noticed that milk curdled faster from cows that grazed on butterwort, a northern European wild herb. The culture was then extracted carefully and used in making butter, cultured cream, and buttermilk. In Scandinavia, it also became a practice to pour fresh milk or cream over the butterwort leaves before making dairy products with it. Either way, using piima to make butter is an extremely simple process. Products made with the piima culture will have a slight tang, similar to buttermilk. Piima can be purchased through mail-order herb distributors or on the Internet (see Sources,
page 209
). It comes in a cream form.
PIIMA BUTTER
INGREDIENTS
2 tablespoons piima culture
(in the form of a cream)
4 cups (2 pints) heavy cream
1.
Put the culture into a clean quart jar. Add the cream and stir. Screw on the lid and store at 70 to 75°F (on top of the refrigerator is a good spot) until the mixture begins to thicken, about 24 hours
2.
After the mixture has thickened to a custardlike consistency (about 1 day) remove a few tablespoons as a starter for another batch if desired. Store the starter in an airtight jar in the refrigerator.
MAKES ABOUT 2 CUPS
PREP TIME: 30 MINUTES
3.
Shake the jar of piima butter for about 15 minutes or until solid butter begins to form, surrounded by the liquid buttermilk. Pour off the buttermilk (save for anther use) and spoon the butter into a small colander. Use a wooden spoon to remove excess liquid. Gently rinse the butter in the colander with cold water to remove any remaining liquid.
SHAPING BUTTER
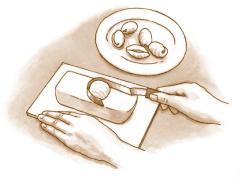
• To make butter balls, chill a pair of wooden butter paddles. Cut butter into tablespoon-size pats. Let butter soften slightly. It should be firm but not brittle. Roll butter pieces between the paddles to form balls. Drop each into ice water as it’s made. Drain before serving.
• To make butter curls, use a metal butter curler. Dip it into hot water before making each curl. Beginning at the far side of a firm (but not too hard) stick of butter, draw the curler toward you lightly and quickly, making a thin curled shaving of butter. Drop the curls into ice water to keep cold until serving. Drain before serving.
BUTTERMILK
True or real buttermilk is a by-product of homemade hand-churned butter.
Buttermilk is the liquid that remains after the butter is made. The liquid contains small particles of floating butter and some traces of butterfat. This gives buttermilk a rich, sweet flavor and makes the drink very refreshing.
But buttermilk is more than just a beverage. Experienced cooks and bakers also know that buttermilk is the secret ingredient for making exceptionally tender and delicious baked goods — from biscuits and pancakes to crumb cakes and layer cakes. Here’s why: When buttermilk, which has acidic qualities, is combined with baking soda, an alkali, in a flour-based batter, bubbles of carbon dioxide begin to form. As the batter bakes, steam
is created; the bubbles expand, causing the batter to rise lightly while acquiring a fine texture. The heat of the oven sets the batter and prevents it from collapsing. The result is a delicate but stable crumb. Buttermilk also adds moisture, richness, and a bit of tang.
The buttermilk sold today in cartons in your market is not the by-product of butter making; it’s made by adding a special bacteria culture to milk. Also called cultured buttermilk, store-bought buttermilk may be made from skim milk with no salt added. Commercial buttermilk lacks the rich, sweet flavor and traces of butter that the original form of buttermilk has, but you can easily achieve this “pure” version by making it at home.
BUTTERMILK
METHOD 1
INGREDIENTS
1 cup whole milk
2 tablespoons cream of tartar
or
1 tablespoon white vinegar
or
1 tablespoon lemon juice
This method will give you a rich, thick buttermilk because it begins with whole milk.
Note:
To use low-fat milk, mix 1 cup with 1 tablespoon plus 1½ teaspoons white vinegar in a 2-cup glass measuring cup and let stand at room temperature for 10 to 15 minutes.
1.
Mix the milk and cream of tartar in a large bowl. Let stand at room temperature for 15 minutes. The milk should start to curdle. Stir well before using.
2.
Refrigerate in an airtight container up to 1 week.
MAKES ABOUT 1¼ CUPS
PREP TIME: 5 MINUTES
BUTTERMILK
METHOD 2
INGREDIENTS
2 cups nonfat milk
6 tablespoons cultured buttermilk
Here’s a low-fat buttermilk that can be used in all baking recipes that call for buttermilk. This recipe can be doubled easily for a larger batch.
1.
Heat the milk in a medium saucepan until it’s slightly warm and bubbles appear around the edges. Do not allow the milk to come to a boil. Stir in the buttermilk, cover loosely, and allow the milk to stand at least 12 hours or overnight at room temperature.
2.
Refrigerate in an airtight container for up to 2 weeks. Stir well before using.
MAKES ABOUT 2½ CUPS
PREP TIME: 15 MINUTES
BUTTERMILK POT CHEESE
INGREDIENTS
8 cups (2 quarts) homemade buttermilk
½ teaspoon salt
(optional)
Similar in consistency to yogurt cheese, this buttermilk cheese makes an excellent base for lower-calorie cheesecakes, dips, and spreads.
1.
Heat buttermilk slowly to 200°F in a large pot. Check temperature with a thermometer. Do not allow it to come to a boil. Remove from heat, cover, and let stand at room temperature for 2 hours or until curd has separated from the whey.
MAKES ABOUT 1 POUND
PREP TIME: 20 MINUTES
2.
Line a large strainer or colander with a double layer of butter muslin and set over a large bowl. Pour the cooled buttermilk through the butter muslin and let drain until no more whey drips from the bottom, about 1 hour. For a dryer curd, refrigerate and let drain for 5 to 6 hours.
3.
Remove curds from the muslin and transfer to a medium bowl. Mix in salt if desired. Cover and refrigerate up to 1 week.

CRÈME FRAÎCHE
Crème fraîche, which translates from French into “fresh cream,”
is often considered the French version of sour cream, but it’s quite different. It’s made from 30 to 40 percent butterfat cream that has been left out to mature and sour naturally without the addition of bacteria starters or cultures. It has a nutty and mild tangy flavor, with a smooth, rich, custardlike texture. When it’s first made, the flavor is slightly sour and the texture is smooth — almost pourable. As it matures, the flavor becomes stronger and the texture thickens, becoming almost solid.
Crème fraîche originated before the days of pasteurization, when refrigeration and fast transportation weren’t available. The cream collected bacteria and fermented before it was able to make its way from the French dairy farms to the markets. The French developed a taste for it and still enjoy the flavor today.
Like all raw creams, crème fraîche contains lactic acid and other ferments. These naturally occurring ferments, if allowed to grow properly, work as thickening agents and also help preserve the cream. This process is disrupted in dairy products made in the United States because they’re pasteurized, which kills the natural ferments and bacteria, but any fresh cream, if left alone at room temperature, will go through this fermenting process.
All crème fraîche has an average of 30 percent butterfat, and some can be as high as 60 percent. Heavy cream in this country comes in at about 35 percent, but the taste is not at all similar to the French type. Because crème fraîche is a matured cream, it’s often referred to as a soured cream, but don’t confuse it with sour cream; they’re different products.