The Home Creamery (4 page)
Authors: Kathy Farrell-Kingsley

Natural carbonation makes kefir fizzy and perfect for smoothies, popular among kefir fans. Simply pour the liquid into a blender and mix with fresh fruit such as strawberries, blueberries, and cut-up fresh mango.
HOMEMADE KEFIR
INGREDIENTS
¼ cup kefir grains
2 cups milk
Kefir is a tangy, slightly bubbly drink made with live kefir grains. It’s very easy to make, and as you continue to make it, the number of kefir grains you have will grow. You can share some of them with friends or store them to use again and again.

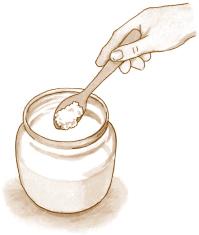
1.
Place the kefir grains in a clean pint glass jar and add the milk. Stir gently, then cover loosely and allow the mixture to sit for 12 to 24 hours at room temperature.
MAKES ABOUT 2 CUPS
PREP TIME: 10 MINUTES
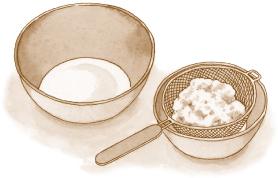
2.
When the kefir culture is ready, the mixture will have thickened and some whey may have separated and the grains will float to the surface. Gently stir the mixture with a wooden spoon. Strain the kefir through a fine sieve, stirring the grains gently (do not press them). Cover and refrigerate the kefir up to 3 weeks.
3.
Do not rinse the grains. You can save them for your next batch in one of two ways: You can let them air-dry on a piece of muslin for a day or two, then store them for 8 to 10 months in a plastic bag set in a cool, dry place. Allow a few extra days to get them started when you’re ready to reactivate the grains.
Another method is to place the grains in a clean jar, cover them with milk, and store them in the refrigerator. The fermentation will slow, allowing you to store them for a few weeks. Strain the grains before using them in your next batch of kefir liquid.
KEFIR-MAKING TIPS
Making kefir is a very simple process, but kefir grains are a living food and therefore subject to a fair degree of natural variation. In other words, making kefir is more an art than a science. This means you’ll find as many different ways of making kefir as there are people making it, and the resulting products can have a variety of flavors. Here are just a few variations in the kefir-making process that will affect the end product:
• There’s a wide variety in the length of time that kefir is left to ferment. Longer fermentation will increase the sourness of the liquid. In the end, how long to leave it depends on how sour you like it. People who like it lightly fermented will leave it for only 12 hours. Those who like a stronger and more active liquid will leave it for 2 or 3 days.
• If timing isn’t a determining factor, you can slow the fermenting process by refrigerating the kefir mixture for about 5 days. The cooler temperature will slow the process and produce a thicker product. Strain the liquid and store in the refrigerator in an airtight container. Save the grains for another batch.
• There’s also a double-fermentation technique that will increase the sourness of the kefir. First, ferment in the usual way by adding the culture to the milk and leaving for 12 to 24 hours. Strain the mixture (save the grains for another batch) and leave the kefir liquid at room temperature for another 12 to 24 hours to ferment again at a slower rate. Cover and refrigerate.
• The kefir culture is endlessly self-propagating. After each batch you’ll have a few more grains as the culture grows. It’s a good idea to rotate the grains you’re using for your regular kefir-making so that they get a chance to restore their vitality.
• Each time you make a fresh batch of kefir reusing the same grains, you’ll need to add to them a greater quantity of milk.
KEFIR TROUBLESHOOTING
IF YOUR KEFIR TASTES TOO STRONG OR TOO WEAK …
• Experiment with the ratio of kefir grains to the amount of milk. For a stronger taste, use anywhere between a 4:1 to 12:1 ratio of milk to ¼ cup kefir grains. For a weaker taste, use from a 12:1 to 24:1 ratio.
IF YOUR KEFIR HAS AN OFF TASTE …
• Rinse the kefir grains with filtered water, then store them in the refrigerator for 1 day in a jar covered with filtered water. Drain the kefir grains, and they will be ready to make a new batch.
BUTTER
For years, making butter
was strictly a home- or farm-based activity. Wooden or crockery dasher-type churns were turned by hand to slosh the cream around until solid butter particles separated from the liquid and massed together. The remaining liquid was buttermilk. Today, homemade butter is a rare taste treat, but making it is a great way to discover the magical properties of milk, and there’s nothing that compares to its fresh taste and silky smooth texture. The principle is really quite simple: Just agitate cream long enough and it will turn into butter!
You can use many different tools to churn your butter — I like to use a food processor, but my kids like to use a simple jar with a tight lid. It’s a fun challenge to shake until you just can’t go on, then pass the jar to someone else, round and round, until it’s ready. It’s good exercise, and kids really think it’s fun.
Besides cow’s milk, butter can also be produced from the milk of buffalo, camel,
goat, sheep, and horse. Sometimes, cultures are added to ferment the milk sugars to lactic acid before the milk is churned into butter. These cultures will produce butter that is rich with a fuller, slightly tangy flavor. Cultured butter is a common European tradition but is less common in America.

OLD-FASHIONED BUTTER CHURN
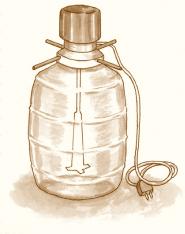
ELECTRIC BUTTER CHURN
If you plan on making butter on a regular basis, you’ll want to invest in a churn (available at dairy supply houses or sometimes second-hand on eBay and at auctions). A hand churn resembles a large, pear-shaped glass jar. A paddle attachment is screwed on as the lid, and users turn a crank handle to create the churning action. If you wish, you can also purchase an electric churn, and if you’re really adventurous, you can still find those old-fashioned wooden upright churns used in pioneer days!
HOMEMADE BUTTER
METHOD 1
INGREDIENTS
4 cups (2 pints) heavy cream
½ teaspoon salt
For the best results, the cream should be at about 60°F when you begin. If it’s too warm, your butter will be soft and won’t keep well; if it’s too cold, your butter will never form.
1.
In a food processor fitted with the metal blade, process the cream until it turns to fine, rice-grain-size solid pieces. It will go through several stages to get to this point, from frothy to soft whipped cream to coarse whipped cream to solid bits, and the color will change from off-white to pale yellow. This will take from 5 to 8 minutes.
MAKES ABOUT 2 CUPS
PREP TIME: 40 MINUTES
2.
Let the butter stand about 5 minutes. The liquid, called buttermilk, will separate from the butter during this time. Set a fine-meshed sieve over a medium bowl. Scrape the butter mixture into the strainer and let the buttermilk drain. Strain the buttermilk again through a fine-meshed sieve, and save for another use if desired.
3.
Transfer the butter to a colander and knead it with a wooden spoon, potato masher, or two forks to remove excess water and blend granules. Pour off the water occasionally, and continue kneading until most of the water has been removed and the butter becomes firmer. This will take about 10 minutes. Mix in salt; this will help retard spoilage as well as add flavor. Keep working until the butter is dense and creamy and all liquid has been worked out, about 10 minutes.

4.
You can form the butter into any shape you wish at this stage: You can make a simple block or press it into ramekins or molds. When you’re done, wrap the butter in wax paper and keep it in the refrigerator.