Programming Python (80 page)

Let’s look at a program that
makes better use of the two automation classes we just
wrote. In the module in
Example 10-4
, theHelloclass inherits from bothGuiMixinandGuiMaker.GuiMakerprovides the link to theFramewidget, plus the menu/toolbar
construction logic.GuiMixinprovides
extra common-behavior methods. Really,Hellois another kind of extendedFramewidget because it is derived fromGuiMaker. To get a menu and toolbar
for free, it simply follows the protocols defined byGuiMaker—it sets themenuBarandtoolBarattributes in itsstartmethod, and overridesmakeWidgetsto put a custom label in the
middle.
Example 10-4. PP4E\Gui\Tools\big_gui.py
"""
GUI demo implementation - combines maker, mixin, and this
"""
import sys, os
from tkinter import *                        # widget classes
from PP4E.Gui.Tools.guimixin import *        # mix-in methods: quit, spawn, etc.
from PP4E.Gui.Tools.guimaker import *        # frame, plus menu/toolbar builder
class Hello(GuiMixin, GuiMakerWindowMenu):   # or GuiMakerFrameMenu
def start(self):
self.hellos = 0
self.master.title("GuiMaker Demo")
self.master.iconname("GuiMaker")
def spawnme(): self.spawn('big_gui.py')        # defer call vs lambda
self.menuBar = [                               # a tree: 3 pull downs
('File', 0,                                  # (pull-down)
[('New...',  0, spawnme),
('Open...', 0, self.fileOpen),          # [menu items list]
('Quit',    0, self.quit)]              # label,underline,action
),
('Edit', 0,
[('Cut',    −1, self.notdone),           # no underline|action
('Paste',  −1, self.notdone),           # lambda:0 works too
'separator',                            # add a separator
('Stuff',  −1,
[('Clone', −1, self.clone),         # cascaded submenu
('More',  −1, self.more)]
),
('Delete', −1, lambda:0),
[5]]                                    # disable 'delete'
),
('Play', 0,
[('Hello',     0, self.greeting),
('Popup...',  0, self.dialog),
('Demos',     0,
[('Toplevels', 0,
lambda: self.spawn(r'..\Tour\toplevel2.py')),
('Frames',    0,
lambda: self.spawn(r'..\Tour\demoAll-frm-ridge.py')),
('Images',    0,
lambda: self.spawn(r'..\Tour\buttonpics.py')),
('Alarm',     0,
lambda: self.spawn(r'..\Tour\alarm.py', wait=False)),
('Other...', −1, self.pickDemo)]
)]
)]
self.toolBar = [                                     # add 3 buttons
('Quit',  self.quit,     dict(side=RIGHT)),        # or {'side': RIGHT}
('Hello', self.greeting, dict(side=LEFT)),
('Popup', self.dialog,   dict(side=LEFT, expand=YES)) ]
def makeWidgets(self):                                   # override default
middle = Label(self, text='Hello maker world!',      # middle of window
width=40, height=10,
relief=SUNKEN, cursor='pencil', bg='white')
middle.pack(expand=YES, fill=BOTH)
def greeting(self):
self.hellos += 1
if self.hellos % 3:
print("hi")
else:
self.infobox("Three", 'HELLO!')    # on every third press
def dialog(self):
button = self.question('OOPS!',
'You typed "rm*" ... continue?',  # old style
'questhead', ('yes', 'no'))       # args ignored
[lambda: None, self.quit][button]()
def fileOpen(self):
pick = self.selectOpenFile(file='big_gui.py')
if pick:
self.browser(pick)     # browse my source file, or other
def more(self):
new = Toplevel()
Label(new,  text='A new non-modal window').pack()
Button(new, text='Quit', command=self.quit).pack(side=LEFT)
Button(new, text='More', command=self.more).pack(side=RIGHT)
def pickDemo(self):
pick = self.selectOpenFile(dir='..')
if pick:
self.spawn(pick)    # spawn any Python program
if __name__ == '__main__':  Hello().mainloop()   # make one, run one
This script lays out a fairly large menu and toolbar structure,
and also adds callback methods of its own that printstdoutmessages, pop up text file browsers and
new windows, and run other programs. Many of the callbacks don’t do much
more than run thenotDonemethod
inherited fromGuiMixin, though; this
code is intended mostly as aGuiMakerandGuiMixindemo.
Whenbig_guiis run as a
top-level program, it creates a window with four menu pull downs on top
and a three-button toolbar on the bottom, shown in
Figure 10-3
along with some of
the pop-up windows its callbacks create. The menus have separators,
disabled entries, and cascading submenus, all as defined by themenuBartemplate used byGuiMaker, and Quit invokes the verifying
dialog inherited fromGuiMixin—some
of the many tools we’re getting for free here.
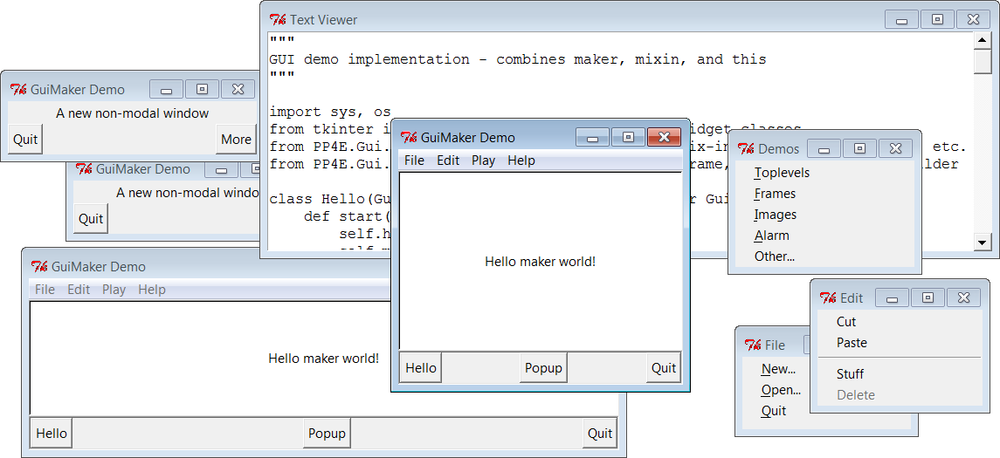
Figure 10-3. big_gui with various pop ups
Figure 10-4
shows
this script’s window again, after its Play pull down has been used to
launch three independently running demos that we wrote in Chapters
8
and
9
. These demos are ultimately started
by using the portable launcher tools we wrote in
Chapter 5
, and acquired from theGuiMixinclass. If you want to run other demos
on your computer, select the Play menu’s Other option to pop up a
standard file selection dialog instead and navigate to the desired
program’s file. One note: I copied the icon bitmap used by the
top-levels demo in the Play menu to this script’s directory; later,
we’ll write tools that attempt to locate one automatically.
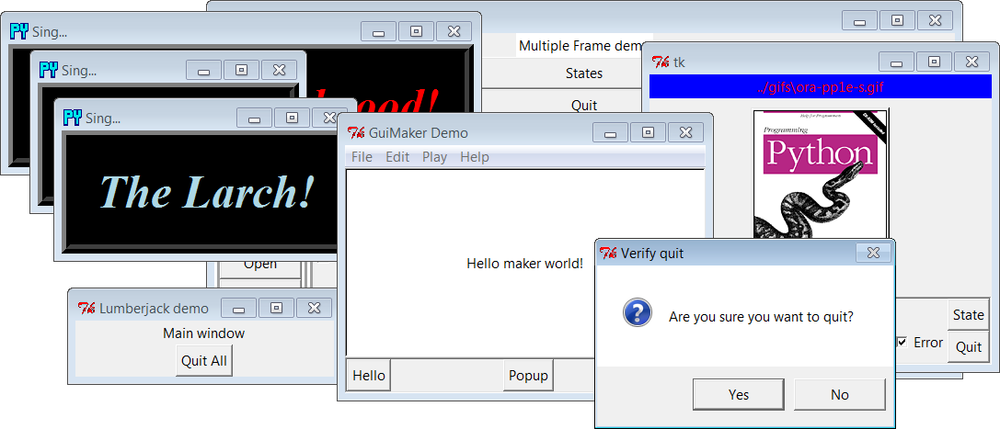
Figure 10-4. big_gui with spawned demos
Finally, I should note thatGuiMakercould be redesigned to use trees of
embedded class instances that know how to apply themselves to the
tkinter widget tree being constructed, instead of branching on the types
of items in template data structures. In the interest of space, though,
we’ll banish that extension to the land of suggested exercises in this
edition.
Speaking of suggested enhancements, in
Chapter 9
, I showed you a first-cut way
to use images instead of text for buttons in toolbars at the bottom of
windows. Adding this option to the GUI maker class as a subclass which
redefines its toolbar construction method would be both a great way to
experiment with the code and a useful utility. If I added every cool
feature imaginable, though, this book could easily become big enough
to be gravitationally significant…
Demos are fun, but to
better show how things like theGuiMixinclass can be of practical use, we need
a more realistic application. Here’s one: suppose you’ve written a set of
command-line system administration scripts, along the lines of those we
studied in
Part II
. As we saw, such scripts
work well from a command line, but require you to remember all their
options each time they are run; if you’re like me, this usually implies
having to pore over the source code after a period of nonuse.
Instead of requiring users of such tools (including yourself) to
type cryptic commands at a shell, why not also provide an easy-to-use
tkinter GUI interface for running such programs? Such a GUI can prompt for
command-line inputs, instead of expecting users to remember them. While
we’re at it, why not generalize the whole notion of running command-line
tools from a GUI, to make it easy to support future tools too?
Examples
10-5
through
10-11
—seven files, spanning two
command-line scripts, one
GUI utility module, two GUI dialogs, and a main GUI and
its options specification module—comprise a concrete implementation of
these artificially rhetorical musings. Because I want this to be a
general-purpose tool that can run any
command
-line program, its design is
factored into modules that become more application-specific as we go
lower in the software hierarchy. At the top, things are about as generic
as they can be, as shown in
Example 10-5
.
Example 10-5. PP4E\Gui\ShellGui\shellgui.py
#!/usr/local/bin/python
"""
################################################################################
tools launcher; uses guimaker templates, guimixin std quit dialog;
I am just a class library: run mytools script to display the GUI;
################################################################################
"""
from tkinter import *                               # get widgets
from PP4E.Gui.Tools.guimixin import GuiMixin        # get quit, not done
from PP4E.Gui.Tools.guimaker import *               # menu/toolbar builder
class ShellGui(GuiMixin, GuiMakerWindowMenu):       # a frame + maker + mixins
def start(self):                                # use GuiMaker if component
self.setMenuBar()
self.setToolBar()
self.master.title("Shell Tools Listbox")
self.master.iconname("Shell Tools")
def handleList(self, event):                    # on listbox double-click
label = self.listbox.get(ACTIVE)            # fetch selection text
self.runCommand(label)                      # and call action here
def makeWidgets(self):                          # add listbox in middle
sbar = Scrollbar(self)                      # cross link sbar, list
list = Listbox(self, bg='white')            # or use Tour.ScrolledList
sbar.config(command=list.yview)
list.config(yscrollcommand=sbar.set)
sbar.pack(side=RIGHT, fill=Y)                     # pack 1st=clip last
list.pack(side=LEFT, expand=YES, fill=BOTH)       # list clipped first
for (label, action) in self.fetchCommands():      # add to listbox
list.insert(END, label)                       # and menu/toolbars
list.bind('', self.handleList)          # set event handler
self.listbox = list
def forToolBar(self, label):                          # put on toolbar?
return True                                       # default = all
def setToolBar(self):
self.toolBar = []
for (label, action) in self.fetchCommands():
if self.forToolBar(label):
self.toolBar.append((label, action, dict(side=LEFT)))
self.toolBar.append(('Quit', self.quit, dict(side=RIGHT)))
def setMenuBar(self):
toolEntries  = []
self.menuBar = [
('File',  0, [('Quit', −1, self.quit)]),    # pull-down name
('Tools', 0, toolEntries)                   # menu items list
]                                           # label,underline,action
for (label, action) in self.fetchCommands():
toolEntries.append((label, −1, action))     # add app items to menu
################################################################################
# delegate to template type-specific subclasses
# which delegate to app tool-set-specific subclasses
################################################################################
class ListMenuGui(ShellGui):
def fetchCommands(self):             # subclass: set 'myMenu'
return self.myMenu               # list of (label, callback)
def runCommand(self, cmd):
for (label, action) in self.myMenu:
if label == cmd: action()
class DictMenuGui(ShellGui):
def fetchCommands(self):
return self.myMenu.items()
def runCommand(self, cmd):
self.myMenu[cmd]()
TheShellGuiclass in this
module knows how to use theGuiMakerandGuiMixininterfaces to construct
a selection window that displays tool names in menus, a scrolled list,
and a toolbar. It also provides aforToolBarmethod that you can override and
that allows subclasses to specify which tools should and should not be
added to the window’s toolbar (the toolbar can become crowded in a
hurry). However, it is deliberately ignorant about both the names of
tools that should be displayed in those places and about the actions to
be run when tool names are selected.
Instead,ShellGuirelies on theListMenuGuiandDictMenuGuisubclasses in this file to provide
a list of tool names from afetchCommandsmethod and dispatch actions by
name in arunCommandmethod. These
two subclasses really just serve to interface to
application
-specific tool sets laid out as
lists or dictionaries, though; they are still naïve about what tool
names really go up on the GUI. That’s by design, too—because the tool
sets displayed are defined by lower subclasses, we can useShellGuito display a variety of different
tool sets.
To get to the
actual tool sets, we need to go one level down. The module
in
Example 10-6
defines
subclasses of the two type-specificShellGuiclasses, to provide sets of available
tools in both list and dictionary formats (you would normally need only
one, but this module is meant for illustration). This is also the module
that is actually
run
to kick off the GUI—theshellguimodule is a class library
only.
Example 10-6. PP4E\Gui\ShellGui\mytools.py
#!/usr/local/bin/python
"""
################################################################################
provide type-specific option sets for application
################################################################################
"""
from shellgui import *                 # type-specific option gui
from packdlg  import runPackDialog     # dialogs for data entry
from unpkdlg  import runUnpackDialog   # they both run app classes
class TextPak1(ListMenuGui):
def __init__(self):
self.myMenu = [('Pack  ', runPackDialog),      # simple functions
('Unpack', runUnpackDialog),    # use same width here
('Mtool ', self.notdone)]       # method from guimixin
ListMenuGui.__init__(self)
def forToolBar(self, label):
return label in {'Pack  ', 'Unpack'}           # 3.x set syntax
class TextPak2(DictMenuGui):
def __init__(self):
self.myMenu = {'Pack  ': runPackDialog,        # or use input here...
'Unpack': runUnpackDialog,      # instead of in dialogs
'Mtool ': self.notdone}
DictMenuGui.__init__(self)
if __name__ == '__main__':                           # self-test code...
from sys import argv                             # 'menugui.py list|^'
if len(argv) > 1 and argv[1] == 'list':
print('list test')
TextPak1().mainloop()
else:
print('dict test')
TextPak2().mainloop()
The classes in this module are specific to a particular tool set;
to display a different set of tool names, simply code and run a new
subclass. By separating out application logic into distinct subclasses
and modules like this, software can become widely reusable.
Figure 10-5
shows the
mainShellGuiwindow created when themytoolsscript is run with its
list-based menu layout class on Windows 7, along with menu tear-offs so
that you can see what they contain. This window’s menu and toolbar are
built byGuiMaker, and its Quit and
Help buttons and menu selections trigger quit and help methods inherited
fromGuiMixinthrough theShellGuimodule’s superclasses. Are you
starting to see why this book preaches code reuse so often?
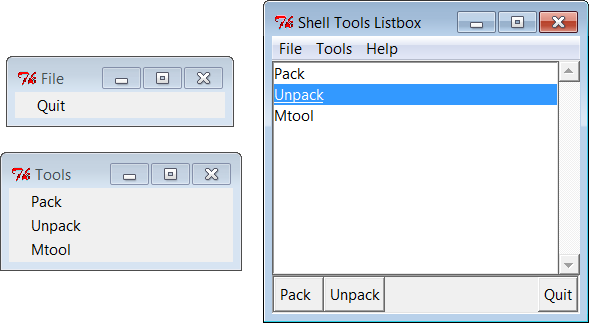
Figure 10-5. mytools items in a ShellGui window
So far, we’ve coded a
general shell tools class library, as well as an
application-specific tool set module that names callback handlers in its
option menus. To complete the picture, we still need to define the
callback handlers run by the GUI, as well as the scripts they ultimately
invoke.
To test the
shell GUI’s ability to run command-line scripts, we need
a few command-line scripts, of course. At the bottom of the hierarchy,
the following two scripts make use of system tools and techniques from
Part II
to implement a simple text file
archive utility. The first,
Example 10-7
, simply
concatenates the contents of multiple text files into a single file,
with predefined separator lines between them.
Example 10-7. PP4E\Gui\ShellGui\packer.py
# pack text files into a single file with separator lines (simple archive)
import sys, glob
marker = ':' * 20 + 'textpak=>'      # hopefully unique separator
def pack(ofile, ifiles):
output = open(ofile, 'w')
for name in ifiles:
print('packing:', name)
input = open(name, 'r').read()        # open the next input file
if input[-1] != '\n': input += '\n'   # make sure it has endline
output.write(marker + name + '\n')    # write a separator line
output.write(input)                   # and write the file's contents
if __name__ == '__main__':
ifiles = []
for patt in sys.argv[2:]:
ifiles += glob.glob(patt)             # not globbed auto on Windows
pack(sys.argv[1], ifiles)                 # pack files listed on cmdline
The second script,
Example 10-8
, scans archive
files created by the first, to unpack into individual files
again.
Example 10-8. PP4E\Gui\ShellGui\unpacker.py
# unpack files created by packer.py (simple textfile archive)
import sys
from packer import marker             # use common separator key
mlen = len(marker)                    # filenames after markers
def unpack(ifile, prefix='new-'):
for line in open(ifile):                # for all input lines
if line[:mlen] != marker:
output.write(line)              # write real lines
else:
name = prefix + line[mlen:-1]   # or make new output
print('creating:', name)
output = open(name, 'w')
if __name__ == '__main__': unpack(sys.argv[1])
These scripts are fairly basic, and this GUI part of the book
assumes you’ve already scanned the system tools chapters, so we won’t
go into their code in depth. Variants of these scripts appeared in the
first edition of this book in 1996; I actually used them early on in
my Python career to bundle files before I could rely on tools like tar
and zip to be present on all the machines I used (and before Python
grew tar and zip support modules in its standard library). Their
operation is straightforward—consider these three text files:
C:\...\PP4E\Gui\ShellGui>type spam.txtspam
Spam
SPAM
C:\...\PP4E\Gui\ShellGui>type eggs.txteggs
C:\...\PP4E\Gui\ShellGui>type ham.txth
a
m
When run from the command line, the packer script combines them
into a single text file, and the unpacker extracts them from there;
the packer must take care to glob (expand) filename patterns, because
this isn’t done by default in Windows:
C:\...\PP4E\Gui\ShellGui>packer.py packed.txt *.txtpacking: eggs.txt
packing: ham.txt
packing: spam.txt
C:\...\PP4E\Gui\ShellGui>unpacker.py packed.txtcreating: new-eggs.txt
creating: new-ham.txt
creating: new-spam.txt
The result files have a unique name by default (with an added
prefix to avoid accidental overwrites, especially during testing), but
you otherwise get back what you packed:
C:\...\PP4E\Gui\ShellGui>type new-spam.txtspam
Spam
SPAM
C:\...\PP4E\Gui\ShellGui>type packed.txt::::::::::::::::::::textpak=>eggs.txt
eggs
::::::::::::::::::::textpak=>ham.txt
h
a
m
::::::::::::::::::::textpak=>spam.txt
spam
Spam
SPAM
These scripts don’t do anything about binary files, compression,
or the like, but they serve to illustrate command-line scripts that
require arguments when run. Although they can be launched with shell
commands as above (and hence Python tools likeos.popenandsubprocess), their logic is also packaged to
be imported and called. For running them from a GUI, we’ll use the
latter direct call
interface.
One final
piece remains. As is, the packing and unpacking scripts
function well as command-line tools. The callback actions named in
Example 10-6
’s
mytools.py
GUI, though, are expected to do
something GUI-oriented. Because the original file packing and
unpacking scripts live in the world of text-based streams and shells,
we need to code wrappers that accept input parameters from more
GUI-minded users. In particular, we need dialogs that prompt for the
command-line arguments required.
First, the module in
Example 10-9
and its client
script in
Example 10-10
use the custom modal dialog techniques we studied in
Chapter 8
to pop up an input display to
collect pack script parameters. The code in
Example 10-9
was split off to a
separate module because it’s generally useful, In fact, we will reuse
it, in both the unpack dialog and again in PyEdit in
Chapter 11
.
This is yet another way to automate GUI construction—using it to
build a form’s rows trades 7 or more lines of code per row (6 without
a linked variable or browse button) for just 1. We’ll see another even
more automatic form building approach in
Chapter 12
’s
form.py
. The utility here, though, is
sufficient to shave dozens of lines of code for nontrivial
forms.
Example 10-9. PP4E\Gui\ShellGui\formrows.py
""""
create a label+entry row frame, with optional file open browse button;
this is a separate module because it can save code in other programs too;
caller (or callbacks here): retain returned linked var while row is in use;
"""
from tkinter import *                                # widgets and presets
from tkinter.filedialog import askopenfilename       # file selector dialog
def makeFormRow(parent, label, width=15, browse=True, extend=False):
var = StringVar()
row = Frame(parent)
lab = Label(row, text=label + '?', relief=RIDGE, width=width)
ent = Entry(row, relief=SUNKEN, textvariable=var)
row.pack(fill=X)                                  # uses packed row frames
lab.pack(side=LEFT)                               # and fixed-width labels
ent.pack(side=LEFT, expand=YES, fill=X)           # or use grid(row, col)
if browse:
btn = Button(row, text='browse...')
btn.pack(side=RIGHT)
if not extend:
btn.config(command=
lambda: var.set(askopenfilename() or var.get()) )
else:
btn.config(command=
lambda: var.set(var.get() + ' ' + askopenfilename()) )
return var
Next,
Example 10-10
’srunPackDialogfunction is the actual
callback handler invoked when tool names are selected in the mainShellGuiwindow. It uses the form
row builder module of
Example 10-9
and applies the
custom modal dialog techniques we studied earlier.
Example 10-10. PP4E\Gui\ShellGui\packdlg.py
# popup a GUI dialog for packer script arguments, and run it
from glob import glob                           # filename expansion
from tkinter import *                           # GUI widget stuff
from packer import pack                         # use pack script/module
from formrows import makeFormRow                # use form builder tool
def packDialog():                               # a new top-level window
win = Toplevel()                            # with 2 row frames + ok button
win.title('Enter Pack Parameters')
var1 = makeFormRow(win, label='Output file')
var2 = makeFormRow(win, label='Files to pack', extend=True)
Button(win, text='OK', command=win.destroy).pack()
win.grab_set()
win.focus_set()                  # go modal: mouse grab, keyboard focus, wait
win.wait_window()                # wait till destroy; else returns now
return var1.get(), var2.get()    # fetch linked var values
def runPackDialog():
output, patterns = packDialog()                  # pop-up GUI dialog
if output != "" and patterns != "":              # till ok or wm-destroy
patterns = patterns.split()                  # do non-GUI part now
filenames = []
for sublist in map(glob, patterns):          # do expansion manually
filenames += sublist                     # Unix shells do this auto
print('Packer:', output, filenames)
pack(ofile=output, ifiles=filenames)         # should show msgs in GUI too
if __name__ == '__main__':
root = Tk()
Button(root, text='popup', command=runPackDialog).pack(fill=X)
Button(root, text='bye',   command=root.quit).pack(fill=X)
root.mainloop()
When run standalone, the “popup” button of script in
Example 10-10
creates the input
form shown in
Figure 10-6
; this is also
what we get when its main function is launched by the
mytools.py
shell tools GUI. Users may
either type input and output filenames into the entry fields or press
the “browse” buttons to pop up standard file selection dialogs. They
can also enter filename patterns—the manualglobcall in this script expands filename
patterns to match names and filters out nonexistent input filenames.
Again, the Unix command line does this pattern expansion automatically
when running the packer from a shell, but Windows does not.
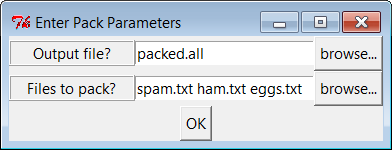
Figure 10-6. The packdlg input form
When the form is filled in and submitted with its OK button,
parameters are finally passed along to the main function of the
non-GUI packer script listed earlier to perform file
concatenations.
The GUI interface to the
unpacking
script
is simpler because there is only one input field—the name of the
packed file to scan. We also get to reuse the form row builder module
developed for the packer’s dialog, because this task is so similar.
The script in
Example 10-11
(and its main
function run by the
mytools.py
shell tool GUI’s selections) generates the input form window shown in
Figure 10-7
.
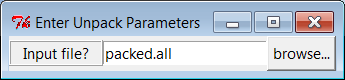
Figure 10-7. The unpkdlg input form
Example 10-11. PP4E\Gui\ShellGui\unpkdlg.py
# popup a GUI dialog for unpacker script arguments, and run it
from tkinter import *                             # widget classes
from unpacker import unpack                       # use unpack script/module
from formrows import makeFormRow                  # form fields builder
def unpackDialog():
win = Toplevel()
win.title('Enter Unpack Parameters')
var = makeFormRow(win, label='Input file', width=11)
win.bind('', lambda event: win.destroy())
win.grab_set()
win.focus_set()                  # make myself modal
win.wait_window()                # till I'm destroyed on return
return var.get()                 # or closed by wm action
def runUnpackDialog():
input = unpackDialog()                    # get input from GUI
if input != '':                           # do non-GUI file stuff
print('Unpacker:', input)             # run with input from dialog
unpack(ifile=input, prefix='')
if __name__ == "__main__":
Button(None, text='popup', command=runUnpackDialog).pack()
mainloop()
The “browse” button in
Figure 10-7
pops up a file selection dialog just as thepackdlgform did. Instead of an OK button,
this dialog binds the Enter key-press event to kill the window and end
the modal wait state pause; on submission, the name of the packed file
is passed to the main function of the unpacker script shown earlier to
perform the actual file scan
process.