Programming Python (8 page)

As a final
introductory script,
Example 1-28
shows how to input data
from the user in anEntrywidget and
display it in a pop-up dialog. Thelambdait uses defers the call to thereplyfunction so that inputs can be passed
in—a common tkinter coding pattern; without thelambda,replywould be called when the button is made,
instead of when it is later pressed (we could also useentas a global variable withinreply, but that makes it less general). This
example also demonstrates how to change the icon and title of a
top-level window; here, the window icon file is located in the same
directory as the script (if the icon call in this script fails on your
platform, try commenting-out the call; icons are notoriously platform
specific).
Example 1-28. PP4E\Preview\tkinter103.py
from tkinter import *
from tkinter.messagebox import showinfo
def reply(name):
showinfo(title='Reply', message='Hello %s!' % name)
top = Tk()
top.title('Echo')
top.iconbitmap('py-blue-trans-out.ico')
Label(top, text="Enter your name:").pack(side=TOP)
ent = Entry(top)
ent.pack(side=TOP)
btn = Button(top, text="Submit", command=(lambda: reply(ent.get())))
btn.pack(side=LEFT)
top.mainloop()
As is, this example is just three widgets attached to theTkmain top-level window; later we’ll learn
how to use nestedFramecontainer
widgets in a window like this to achieve a variety of layouts for its
three widgets.
Figure 1-6
gives the
resulting main and pop-up windows after the Submit button is pressed.
We’ll see something very similar later in this chapter, but rendered in
a web browser with HTML.
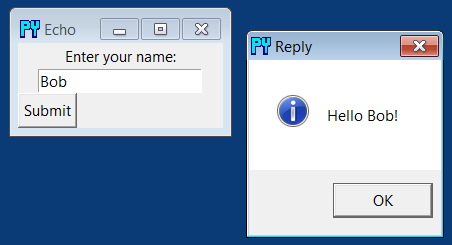
Figure 1-6. Fetching input from a user
The code we’ve seen so far demonstrates many of the core concepts
in GUI programming, but tkinter is much more powerful than these
examples imply. There are more than 20 widgets in tkinter and many more
ways to input data from a user, including multiple-line text, drawing
canvases, pull-down menus, radio and check buttons, and scroll bars, as
well as other layout and event handling mechanisms. Beyond tkinter
itself, both open source extensions such as PMW, as well as the Tix and
ttk toolkits now part of Python’s standard library, can add additional
widgets we can use in our Python tkinter GUIs and provide an even more
professional look and feel. To hint at what is to come, let’s put
tkinter to work on our database of people.
For our database
application, the first thing we probably want is a GUI for
viewing the stored data—a form with field names and values—and a way to
fetch records by key. It would also be useful to be able to update a
record with new field values given its key and to add new records from
scratch by filling out the form. To keep this simple, we’ll use a single
GUI for all of these tasks.
Figure 1-7
shows the window we
are going to code as it looks in Windows 7; the record for the keysuehas been fetched and displayed
(our shelve is as we last left it again). This record is really an
instance of our class in our shelve file, but the user doesn’t need to
care.
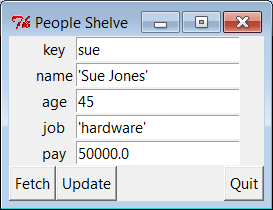
Figure 1-7. peoplegui.py main display/input window
Also, to keep this
simple, we’ll assume that all records in the database
have the same sets of fields. It would be a minor extension to
generalize this for any set of fields (and come up with a general form
GUI constructor tool in the process), but we’ll defer such evolutions
to later in this book.
Example 1-29
implements the GUI
shown in
Figure 1-7
.
Example 1-29. PP4E\Preview\peoplegui.py
"""
Implement a GUI for viewing and updating class instances stored in a shelve;
the shelve lives on the machine this script runs on, as 1 or more local files;
"""
from tkinter import *
from tkinter.messagebox import showerror
import shelve
shelvename = 'class-shelve'
fieldnames = ('name', 'age', 'job', 'pay')
def makeWidgets():
global entries
window = Tk()
window.title('People Shelve')
form = Frame(window)
form.pack()
entries = {}
for (ix, label) in enumerate(('key',) + fieldnames):
lab = Label(form, text=label)
ent = Entry(form)
lab.grid(row=ix, column=0)
ent.grid(row=ix, column=1)
entries[label] = ent
Button(window, text="Fetch",  command=fetchRecord).pack(side=LEFT)
Button(window, text="Update", command=updateRecord).pack(side=LEFT)
Button(window, text="Quit",   command=window.quit).pack(side=RIGHT)
return window
def fetchRecord():
key = entries['key'].get()
try:
record = db[key]                      # fetch by key, show in GUI
except:
showerror(title='Error', message='No such key!')
else:
for field in fieldnames:
entries[field].delete(0, END)
entries[field].insert(0, repr(getattr(record, field)))
def updateRecord():
key = entries['key'].get()
if key in db:
record = db[key]                      # update existing record
else:
from person import Person             # make/store new one for key
record = Person(name='?', age='?')    # eval: strings must be quoted
for field in fieldnames:
setattr(record, field, eval(entries[field].get()))
db[key] = record
db = shelve.open(shelvename)
window = makeWidgets()
window.mainloop()
db.close() # back here after quit or window close
This script uses the widgetgridmethod to arrange labels and entries,
instead ofpack; as we’ll see
later, gridding arranges by rows and columns, and so it is a natural
for forms that horizontally align labels with entries well. We’ll also
see later that forms can usually be laid out just as nicely usingpackwith nested row frames and
fixed-width labels. Although the GUI doesn’t handle window resizes
well yet (that requires configuration options we’ll explore later),
adding this makes thegridandpackalternatives roughly the same
in code size.
Notice how the end of this script opens the shelve as a global
variable and starts the GUI; the shelve remains open for the lifespan
of the GUI (mainloopreturns only
after the main window is closed). As we’ll see in the next section,
this state retention is very different from the web model, where each
interaction is normally a standalone program. Also notice that the use
of global variables makes this code simple but unusable outside the
context of our database; more on this later.
The GUI we’re building is fairly basic, but it provides a view
on the shelve file and allows us to browse and update the file without
typing any code. To fetch a record from the shelve and display it on
the GUI, type its key into the GUI’s “key” field and click Fetch. To
change a record, type into its input fields after fetching it and
click Update; the values in the GUI will be written to the record in
the database. And to add a new record, fill out all of the GUI’s
fields with new values and click Update—the new record will be added
to the shelve file using the key and field inputs you provide.
In other words, the GUI’s fields are used for both display and
input.
Figure 1-8
shows the scene after adding a new record (via Update), and
Figure 1-9
shows an error
dialog pop up issued when users try to fetch a key that isn’t present
in the shelve.
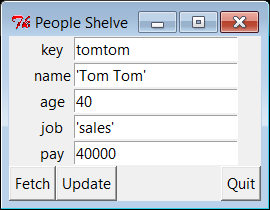
Figure 1-8. peoplegui.py after adding a new persistent object
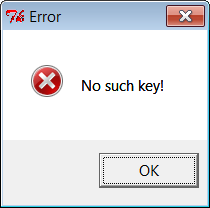
Figure 1-9. peoplegui.py common error dialog pop up
Notice how we’re usingrepragain to display field values fetched from the shelve andevalto convert field values to Python
objects before they are stored in the shelve. As mentioned previously,
this is potentially dangerous if someone sneaks some malicious code
into our shelve, but we’ll finesse such concerns for now.
Keep in mind, though, that this scheme means that strings must
be quoted in input fields other than the key—they are assumed to be
Python code. In fact, you could type an arbitrary Python expression in
an input field to specify a value for an update. Typing"Tom"*3in the name field, for instance,
would set the name toTomTomTomafter an update (for better or worse!); fetch to see the
result.
Even though we now have a GUI for browsing and changing records,
we can still check our work by interactively opening and inspecting
the shelve file or by running scripts such as the dump utility in
Example 1-19
. Remember,
despite the fact that we’re now viewing records in a GUI’s windows,
the database is a Python shelve file containing native Python class
instance objects, so any Python code can access it. Here is the dump
script at work after adding and changing a few persistent objects in
the GUI:
...\PP4E\Preview>python dump_db_classes.pysue =>
Sue Jones 50000.0
bill =>
bill 9999
nobody =>
John Doh None
tomtom =>
Tom Tom 40000
tom =>
Tom Doe 90000
bob =>
Bob Smith 30000
peg =>
1 4
Smith
Doe
Although this GUI
does the job, there is plenty of room for
improvement:
As coded, this GUI is a simple set of functions that share
the global list of input fields (entries) and a global shelve (db). We might instead passdbin tomakeWidgets, and pass along both these
two objects as function arguments to the callback handlers using
thelambdatrick of the prior
section. Though not crucial in a script this small, as a rule of
thumb, making your external dependencies explicit like this makes
your code both easier to understand and reusable in other
contexts.We could also structure this GUI as a class to support
attachment and customization (globals would become instance
attributes), though it’s unlikely that we’ll need to reuse such a
specific GUI.More usefully, we could pass in the
fieldnamestuple as an input parameter
to the functions here to allow them to be used for other record
types in the future. Code at the bottom of the file would
similarly become a function with a passed-in shelve filename, and
we would also need to pass in a new record construction call to
the update function becausePersoncould not be hardcoded. Such
generalization is beyond the scope of this preview, but it makes
for a nice exercise if you are so inclined. Later, I’ll also point
you to a suggested reading example in the book examples package,
PyForm, which takes a different approach to generalized form
construction.To make this GUI more user friendly, it might also be nice
to add an index window that displays all the keys in the database
in order to make browsing easier. Some sort of verification before
updates might be useful as well, and Delete and Clear buttons
would be simple to code. Furthermore, assuming that inputs are
Python code may be more bother than it is worth; a simpler input
scheme might be easier and safer. (I won’t officially say these
are suggested exercises too, but it sounds like they could
be.)We could also support window resizing (as we’ll learn,
widgets can grow and shrink with the window) and provide an
interface for calling methods available on stored instances’
classes too (as is, thepayfield can be updated, but there is no way to invoke thegiveRaisemethod).If we plan to distribute this GUI widely, we might package
it up as a standalone executable program
—a
frozen binary
in Python
terminology—using third-party tools such as Py2Exe, PyInstaller,
and others (search the Web for pointers). Such a program can be
run directly without installing Python on the receiving end,
because the Python bytecode interpreter is included in the
executable itself.
I’ll leave all such extensions as points to ponder, and revisit
some of them later in this book.
Before we
move on, two notes. First, I should mention that even
more graphical packages are available to Python programmers. For
instance, if you need to do graphics beyond basic windows, the tkinter
Canvas widget supports freeform graphics. Third-party
extensions such as Blender, OpenGL, VPython, PIL, VTK, Maya, and
PyGame provide even more advanced graphics, visualization, and
animation tools for use with Python scripts. Moreover, the PMW, Tix,
and ttk widget kits mentioned earlier extend tkinter itself. See
Python’s library manual for Tix and ttk, and try the PyPI site or a
web search for third-party graphics extensions.
And in deference to fans of other GUI toolkits such as wxPython
and PyQt, I should also note that there are other GUI options to
choose from and that choice is sometimes very subjective. tkinter is
shown here because it is mature, robust, fully open source, well
documented, well supported, lightweight, and a standard part of
Python. By most accounts, it remains the standard for building
portable GUIs in Python.
Other GUI toolkits for Python have pros and cons of their own,
discussed later in this book. For example, some exchange code
simplicity for richer widget sets. wxPython, for example, is much more
feature-rich, but it’s also much more complicated to use. By and
large, though, other toolkits are variations on a theme—once you’ve
learned one GUI toolkit, others are easy to pick up. Because of that,
we’ll focus on learning one toolkit in its entirety in this book
instead of sampling many partially.
Although they are free to employ network access at will,
programs written with traditional GUIs like tkinter generally run on a
single, self-contained machine. Some consider web pages to be a kind
of GUI as well, but you’ll have to read the next and final section of
this chapter to judge that for
yourself.
For a Good Time…
There’s much more to the tkinter toolkit than we’ve touched on
in this preview, of course, and we’ll study it in depth in this
book. As another quick example to hint at what’s possible, though,
the following script,
fungui.py
, uses the Pythonrandommodule to
pick from a list, makes new independent windows withToplevel, and uses the tkinteraftercallback to loop by scheduling
methods to run again after a number of
milliseconds
:
from tkinter import *
import random
fontsize = 30
colors = ['red', 'green', 'blue', 'yellow', 'orange', 'cyan', 'purple']
def onSpam():
popup = Toplevel()
color = random.choice(colors)
Label(popup, text='Popup', bg='black', fg=color).pack(fill=BOTH)
mainLabel.config(fg=color)
def onFlip():
mainLabel.config(fg=random.choice(colors))
main.after(250, onFlip)
def onGrow():
global fontsize
fontsize += 5
mainLabel.config(font=('arial', fontsize, 'italic'))
main.after(100, onGrow)
main = Tk()
mainLabel = Label(main, text='Fun Gui!', relief=RAISED)
mainLabel.config(font=('arial', fontsize, 'italic'), fg='cyan',bg='navy')
mainLabel.pack(side=TOP, expand=YES, fill=BOTH)
Button(main, text='spam', command=onSpam).pack(fill=X)
Button(main, text='flip', command=onFlip).pack(fill=X)
Button(main, text='grow', command=onGrow).pack(fill=X)
main.mainloop()
Run this on your own to see how it works. It creates a main
window with a custom label and three buttons—one button pops up a
new window with a randomly colored label, and the other two kick off
potentially independent timer loops, one of which keeps changing the
color used in the main window, and another that keeps expanding the
main window label’s font. Be careful if you do run this, though; the
colors flash, and the label font gets bigger 10 times per second, so
be sure you are able to kill the main window before it gets away
from you. Hey—I warned you!