Programming Python (10 page)

In the basic
CGI example shown earlier, we ran the Python script by
filling out and submitting a form that contained the name of the script.
Really, server-side CGI scripts can be invoked in a variety of
ways—either by submitting an input form as shown so far or by sending
the server an explicit URL (Internet address) string that contains
inputs at the end. Such an explicit URL can be sent to a server either
inside or outside of a browser; in a sense, it bypasses the traditional
input form page.
For instance,
Figure 1-12
shows the reply
generated by the server after typing a URL of the following form in the
address field at the top of the web browser (+means a space here):
http://localhost/cgi-bin/cgi101.py?user=Sue+Smith
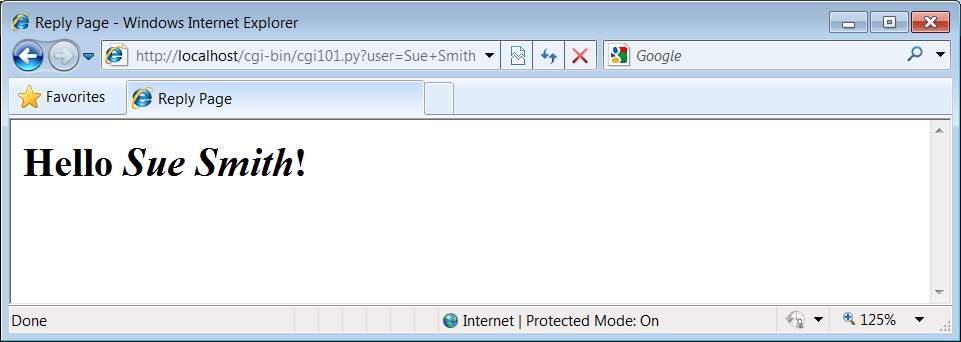
Figure 1-12. cgi101.py reply to GET-style query parameters
The inputs here, known as
query parameters
,
show up at the end of the URL after the?; they are not entered into a form’s input
fields. Adding inputs to URLs is sometimes called a GET request. Our
original input form uses the POST method, which instead ships inputs in
a separate step. Luckily, Python CGI scripts don’t have to distinguish
between the two; thecgimodule’s
input parser handles any data submission method differences for
us.
It’s even possible, and often useful, to submit URLs with inputs
appended as query parameters completely outside any web browser. The
Pythonurllibmodule package, for
instance, allows us to read the reply generated by a server for any
valid URL. In effect, it allows us to visit a web page or invoke a CGI
script from within another script; your Python code, instead of a
browser, acts as the web client. Here is this module in action, run from
the interactive command line:
>>>from urllib.request import urlopen>>>conn = urlopen('http://localhost/cgi-bin/cgi101.py?user=Sue+Smith')>>>reply = conn.read()>>>replyb'Reply Page \nHello Sue Smith!\n'
>>>urlopen('http://localhost/cgi-bin/cgi101.py').read()b'Reply Page \nWho are you?\n'
>>>urlopen('http://localhost/cgi-bin/cgi101.py?user=Bob').read()b'Reply Page \nHello Bob!\n'
Theurllibmodule package gives
us a file-like interface to the server’s reply for a URL. Notice that
the output we read from the server is raw HTML code (normally rendered
by a browser). We can process this text with any of Python’s
text-processing tools, including:
String methods to search and split
The
reregular expression
pattern-matching moduleFull-blown HTML and XML parsing support in the standard
library, includinghtml.parser,
as well as SAX-, DOM-, and ElementTree–style XML parsing
tools.
When combined with such tools, theurllibpackage is a natural for a variety of
techniques—
ad-hoc interactive
testing of websites, custom client-side GUIs, “screen scraping” of web
page content, and automated regression testing systems for remote
server
-side CGI
scripts.
One last fine point:
because CGI scripts use text to communicate with clients,
they need to format their replies according to a set of rules. For
instance, notice how
Example 1-31
adds a blank line between
the reply’s header and its HTML by printing an explicit newline
(\n) in addition to the oneprintadds automatically; this is a required
separator.
Also note how the text inserted into the HTML reply is run through
thecgi.escape(a.k.a.html.escapein Python 3.2; see the note under
Python HTML and URL Escape Tools
) call, just in case the
input includes a character that is special in HTML. For example,
Figure 1-13
shows the reply we receive for
form inputBob Smith—the</i>in the reply, and
so doesn’t interfere with real HTML code (use your browser’s view source
option to see this for yourself); if not escaped, the rest of the name
would not be italicized.
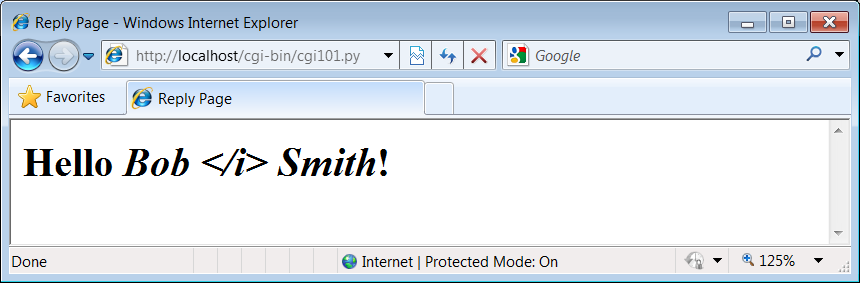
Figure 1-13. Escaping HTML characters
Escaping text like this isn’t always required, but it is a good
rule of thumb when its content isn’t known; scripts that generate HTML
have to respect its rules. As we’ll see later in this book, a related
call,urllib.parse.quote, applies URL
escaping rules to text. As we’ll also see, larger frameworks often
handle text formatting tasks for us.
Now, to use the CGI
techniques of the prior sections for our database
application, we basically just need a bigger input and reply form.
Figure 1-14
shows the form we’ll implement
for accessing our database in a web browser.
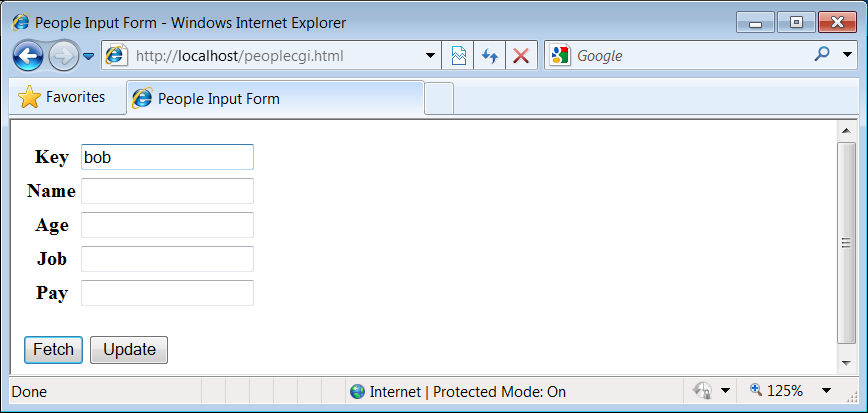
Figure 1-14. peoplecgi.html input page
To implement the interaction, we’ll code an initial HTML input
form, as well as a Python CGI script for displaying fetch results and
processing update requests.
Example 1-33
shows the input form’s
HTML code that builds the page in
Figure 1-14
.
Example 1-33. PP4E\Preview\peoplecgi.html
People Input Form
To handle form (and other) requests,
Example 1-34
implements a Python CGI
script that fetches and updates our shelve’s records. It echoes back a
page similar to that produced by
Example 1-33
, but with the form
fields filled in from the attributes of actual class objects in the
shelve database.
As in the GUI, the same web page is used for both displaying
results and inputting updates. Unlike the GUI, this script is run anew
for each step of user interaction, and it reopens the database each
time (the reply page’sactionfield
provides a link back to the script for the next request). The basic
CGI model provides no automatic memory from page to page, so we have
to start from scratch each time.
Example 1-34. PP4E\Preview\cgi-bin\peoplecgi.py
"""
Implement a web-based interface for viewing and updating class instances
stored in a shelve; the shelve lives on server (same machine if localhost)
"""
import cgi, shelve, sys, os # cgi.test() dumps inputs
shelvename = 'class-shelve' # shelve files are in cwd
fieldnames = ('name', 'age', 'job', 'pay')
form = cgi.FieldStorage() # parse form data
print('Content-type: text/html') # hdr, blank line is in replyhtml
sys.path.insert(0, os.getcwd()) # so this and pickler find person
# main html template
replyhtml = """People Input Form
"""
# insert html for data rows at $ROWS$
rowhtml = '
rowshtml = ''
for fieldname in fieldnames:
rowshtml += (rowhtml % ((fieldname,) * 3))
replyhtml = replyhtml.replace('$ROWS$', rowshtml)
def htmlize(adict):
new = adict.copy()
for field in fieldnames: # values may have &, >, etc.
value = new[field] # display as code: quoted
new[field] = cgi.escape(repr(value)) # html-escape special chars
return new
def fetchRecord(db, form):
try:
key = form['key'].value
record = db[key]
fields = record.__dict__ # use attribute dict
fields['key'] = key # to fill reply string
except:
fields = dict.fromkeys(fieldnames, '?')
fields['key'] = 'Missing or invalid key!'
return fields
def updateRecord(db, form):
if not 'key' in form:
fields = dict.fromkeys(fieldnames, '?')
fields['key'] = 'Missing key input!'
else:
key = form['key'].value
if key in db:
record = db[key] # update existing record
else:
from person import Person # make/store new one for key
record = Person(name='?', age='?') # eval: strings must be quoted
for field in fieldnames:
setattr(record, field, eval(form[field].value))
db[key] = record
fields = record.__dict__
fields['key'] = key
return fields
db = shelve.open(shelvename)
action = form['action'].value if 'action' in form else None
if action == 'Fetch':
fields = fetchRecord(db, form)
elif action == 'Update':
fields = updateRecord(db, form)
else:
fields = dict.fromkeys(fieldnames, '?') # bad submit button value
fields['key'] = 'Missing or invalid action!'
db.close()
print(replyhtml % htmlize(fields)) # fill reply from dict
This is a fairly large script, because it has to handle user
inputs, interface with the database, and generate HTML for the reply
page. Its behavior is fairly straightforward, though, and similar to
the GUI of the prior section.
A few fine points
before we move on. First of all, make sure the web
server script we wrote earlier in
Example 1-32
is running before you
proceed; it’s going to catch our requests and route them to our
script.
Also notice how this script adds the current working directory
(os.getcwd) to thesys.pathmodule search path when it first
starts. Barring aPYTHONPATHchange, this is required to allow both the pickler and this script
itself to import thepersonmodule
one level up from the script. Because of the new way the web server
runs CGI scripts in
Python 3
,
the current working directory isn’t added tosys.path, even though the shelve’s files are
located there correctly when opened. Such details can vary per
server.
The only other feat of semi-magic the CGI script relies on is
using a record’s attribute dictionary (__dict__) as the source of values when
applying HTML escapes to field values and string formatting to the
HTML reply template string in the last line of the script. Recall that
a%(key)codereplacement target
fetches a value by key from a
dictionary
:
>>>D = {'say': 5, 'get': 'shrubbery'}>>>D['say']5
>>>S = '%(say)s => %(get)s' % D>>>S'5 => shrubbery'
By using an object’s attribute dictionary, we can refer to
attributes by name in the format string. In fact, part of the reply
template is generated by code. If its structure is confusing, simply
insert statements to printreplyhtmland to callsys.exit, and run from a simple command
line. This is how the table’s HTML in the middle of the reply is
generated (slightly formatted here for readability):
| key | |
|---|---|
| name | |
| age | |
| job | |
| pay |
This text is then filled in with key values from the record’s
attribute dictionary by string formatting at the end of the script.
This is done after running the dictionary through a utility to convert
its values to code text withreprand escape that text per HTML conventions withcgi.escape(again, the last step isn’t
always required, but it’s generally a good practice).
These HTML reply lines could have been hardcoded in the script,
but generating them from a tuple of field names is a more general
approach—we can add new fields in the future without having to update
the HTML template each time. Python’s string processing tools make
this a snap.
In the interest of fairness, I should point out that Python’s
newerstr.formatmethod could
achieve much the same effect as the traditional%format expression used by this script, and
it provides specific syntax for referencing object attributes which to
some might seem more explicit than using__dict__keys:
>>>D = {'say': 5, 'get': 'shrubbery'}>>>'%(say)s => %(get)s' % D# expression: key reference
'5 => shrubbery'
>>>'{say} => {get}'.format(**D)# method: key reference
'5 => shrubbery'
>>>from person import Person>>>bob = Person('Bob', 35)>>>'%(name)s, %(age)s' % bob.__dict__# expression: __dict__ keys
'Bob, 35'
>>>'{0.name} => {0.age}'.format(bob)# method: attribute syntax
'Bob => 35'
Because we need to escape attribute values first, though, the
format method call’s attribute syntax can’t be used directly this way;
the choice is really between both technique’s key reference syntax
above. (At this writing, it’s not clear which formatting technique may
come to dominate, so we take liberties with using either in this book;
if one replaces the other altogether someday, you’ll want to go with
the winner.)
In the interest of security, I also need to remind you one last
time that theevalcall used in
this script to convert inputs to Python objects is powerful, but not
secure—it happily runs any Python code, which can perform any system
modifications that the script’s process has permission to make. If you
care, you’ll need to trust the input source, run in a restricted
environment, or use more focused input converters likeintandfloat. This is generally a larger concern in
the Web world, where request strings might arrive from arbitrary
sources. Since we’re all friends here, though, we’ll ignore
the threat.
Despite the extra complexities of servers, directories, and
strings, using the web interface is as simple as using the GUI, and it
has the added advantage of running on any machine with a browser and
Web connection. To fetch a record, fill in the Key field and click
Fetch; the script populates the page with field data grabbed from the
corresponding class instance in the shelve, as illustrated in
Figure 1-15
for keybob.

Figure 1-15. peoplecgi.py reply page
Figure 1-15
shows what happens
when the key comes from the posted form. As usual, you can also invoke
the CGI script by instead passing inputs on a query string at the end
of the URL;
Figure 1-16
shows the reply we get when accessing a URL of the following
form:
http://localhost/cgi-bin/peoplecgi.py?action=Fetch&key=sue
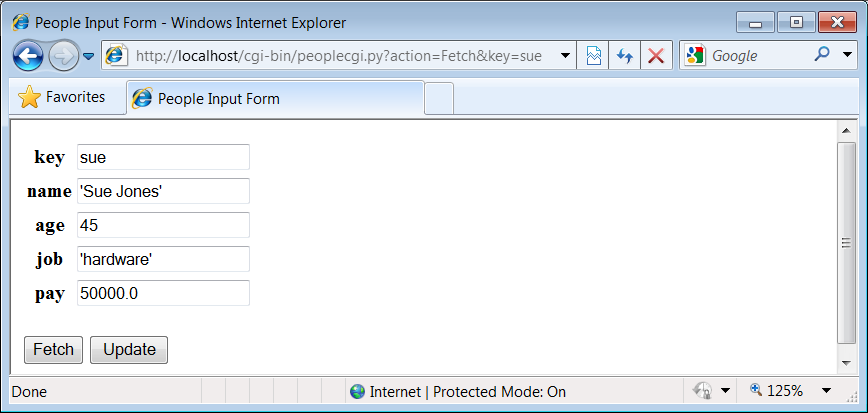
Figure 1-16. peoplecgi.py reply for query parameters
As we’ve seen, such a URL can be submitted either within your
browser or by scripts that use tools such as theurllibpackage. Again, replace “localhost”
with your server’s domain name if you are running the script on a
remote machine.
To update a record, fetch it by key, enter new values in the
field inputs, and click Update; the script will take the input fields
and store them in the attributes of the class instance in the shelve.
Figure 1-17
shows the reply we get
after updatingsue.
Finally, adding a record works the same as in the GUI: fill in a
new key and field values and click Update; the CGI script creates a
new class instance, fills out its attributes, and stores it in the
shelve under the new key. There really is a class object behind the
web page here, but we don’t have to deal with the logic used to
generate it.
Figure 1-18
shows a
record added to the database in this way.
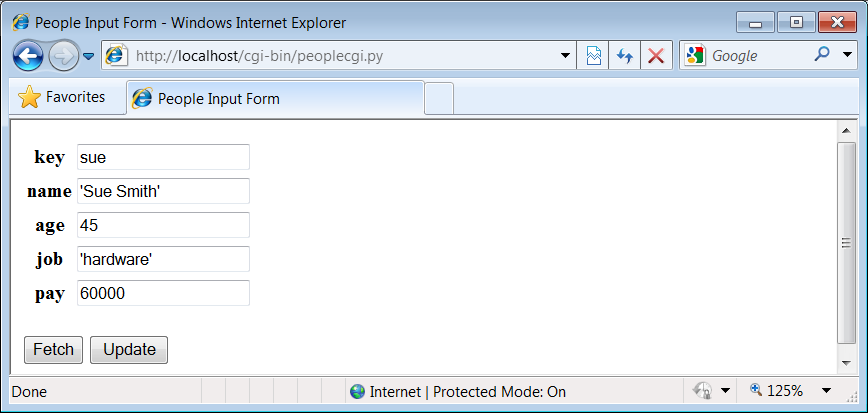
Figure 1-17. peoplecgi.py update reply
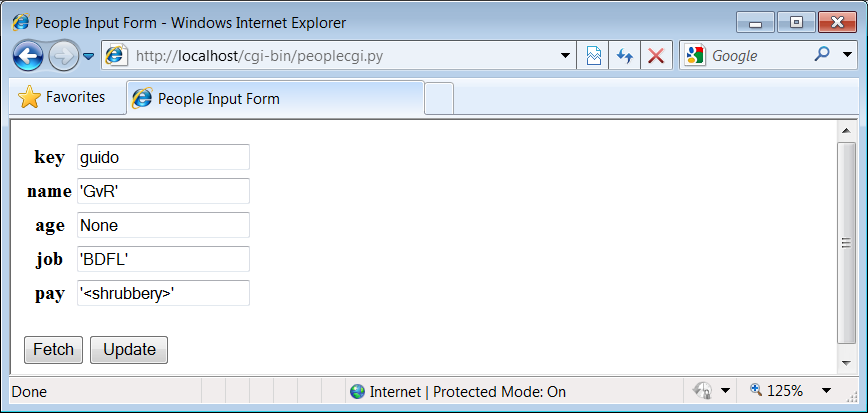
Figure 1-18. peoplecgi.py after adding a new record
In principle, we could also update and add records by submitting
a URL—either from a browser or from a script—such as:
http://localhost/cgi-bin/
peoplecgi.py?action=Update&key=sue&pay=50000&name=Sue+Smith&
...more...
Except for automated tools, though, typing such a long URL will
be noticeably more difficult than filling out the input page. Here is
part of the reply page generated for the “guido” record’s display of
Figure 1-18
(use your
browser’s “view page source” option to see this for yourself). Note
how the<and>characters are translated to HTML
escapes withcgi.escapebefore
being inserted into the reply:
key name age job pay As usual, the standard library
urllibmodule package comes in handy for
testing our CGI script; the output we get back is raw HTML, but we can
parse it with other standard library tools and use it as the basis of
a server-side script regression testing system run on any
Internet-capable machine. We might even parse the server’s reply
fetched this way and display its data in a client-side GUI coded with
tkinter; GUIs and web pages are not mutually exclusive techniques. The
last test in the following interaction shows a portion of the error
message page’s HTML that is produced when the action is missing or
invalid in the inputs, with line breaks added for readability:>>>from urllib.request import urlopen>>>url = 'http://localhost/cgi-bin/peoplecgi.py?action=Fetch&key=sue'>>>urlopen(url).read()b'\nPeople Input Form \n\n