Programming Python (153 page)

Once we understand
how to send inputs to forms as query string parameters
at the end of URLs like this, the Pythonurllib.requestmodule we met in Chapters
1
and
13
becomes even more useful. Recall
that this module allows us to fetch the reply generated for any URL
address. When the URL names a simple HTML file, we simply download its
contents. But when it names a CGI script, the effect is to run the
remote script and fetch its output. This notion opens the door to
web services
, which generate useful XML in
response to input parameters; in simpler roles, this allows us to
test
remote scripts.
For example, we can trigger the script in
Example 15-8
directly, without
either going through the
tutor3.html
web page or typing a URL in a
browser’s address field:
C:\...\PP4E\Internet\Web>python>>>from urllib.request import urlopen>>>reply = urlopen('http://localhost/cgi-bin/tutor3.py?user=Brian').read()>>>replyb'tutor3.py \nGreetings
\n
\nHello, Brian.
\n
\n'
>>>print(reply.decode())tutor3.py Greetings
Hello, Brian.
>>>url = 'http://localhost/cgi-bin/tutor3.py'>>>conn = urlopen(url)>>>reply = conn.read()>>>print(reply.decode())tutor3.py Greetings
Who are you?
Recall from
Chapter 13
thaturllib.request.urlopengives us a file object connected to the generated reply
stream. Reading this file’s output returns the HTML that would
normally be intercepted by a web browser and rendered into a reply
page. The reply comes off of the underlying socket asbytesin 3.X, but can be decoded tostrstrings as needed.
When fetched directly this way, the HTML reply can be parsed
with Python text processing tools, including string methods likesplitandfind, therepattern-matching module, or thehtml.parserHTML parsing module—all tools
we’ll explore in
Chapter 19
. Extracting text
from the reply like this is sometimes informally called
screen scraping
—a way to use
website content in other programs. Screen scraping is an alternative
to more complex web services frameworks, though a brittle one: small
changes in the page’s format can often break scrapers that rely on it.
The reply text can also be simply inspected—urllib.requestallows us to test CGI scripts
from the Python interactive prompt or other scripts, instead of a
browser.
More generally, this technique allows us to use a server-side
script as a sort of function call. For instance, a client-side GUI can
call the CGI script and parse the generated reply page. Similarly, a
CGI script that updates a database may be invoked programmatically
withurllib.request, outside the
context of an input form page. This also opens the door to automated
regression testing of CGI scripts—we can invoke scripts on any remote
machine, and compare their reply text to the expected output.
[
60
]
We’ll seeurllib.requestin action again in later
examples.
Before we move on, here are a few advancedurllib.requestusage notes. First, this
module also supports proxies, alternative transmission modes, the
client side of secure HTTPS, cookies, redirections, and more. For
instance, proxies are supported transparently with environment
variables or system settings, or by usingProxyHandlerobjects
in this module (see its
documentation for details and examples).
Moreover, although it normally doesn’t make a difference to
Python scripts, it is possible to send parameters in both thegetand theputsubmission modes described earlier withurllib.request. Thegetmode, with parameters in the query
string at the end of a URL as shown in the prior listing, is used by
default. To invokepost, pass
parameters in as a separate argument:
>>>from urllib.request import urlopen>>>from urllib.parse import urlencode>>>params = urlencode({'user': 'Brian'})>>>params'user=Brian'
>>>
>>>print(urlopen('http://localhost/cgi-bin/tutor3.py', params).read().decode())tutor3.py Greetings
Hello, Brian.
Finally, if your web application depends on client-side cookies
(discussed later) these are supported byurllib.requestautomatically, using Python’s
standard library cookie support to store cookies locally, and later
return them to the server. It also supports redirection,
authentication, and more; the client side of secure HTTP transmissions
(HTTPS) is supported if your computer has secure sockets support
available (most do). See the Python library manual for details. We’ll
explore both cookies later in this chapter, and introduce secure HTTPS
in the
next.
Now let’s move on to
something a bit more realistic. In most CGI applications,
input pages are composed of multiple fields. When there is more than
one, input labels and fields are typically laid out in a table, to give
the form a well-structured appearance. The HTML file in
Example 15-9
defines a form with two
input fields.
Example 15-9. PP4E\Internet\Web\tutor4.html
CGI 101

A second user interaction: tables
The Figure 15-10. A form laid out with table tags When this form’s Submit button (labeled “Send” by the page’s HTML) Example 15-10. PP4E\Internet\Web\cgi-bin\tutor4.py The table layout comes from the HTML file, not from this Python Figure 15-11. Reply page generated by tutor4.py As usual, we can pass parameters to this CGI script at the end of Figure 15-12. Reply page from tutor4.py for parameters in URL Notice that we have two parameters after the Although Just for fun, the But you should never use Unless you run CGI scripts in processes with limited Errors happen, This script assigns The Here are a few general tips for debugging your server-side CGI It probably won’t generate HTML as is, but running it This will generally make the text of Python error messages For instance, define classes that mimic the CGI inputs The CGI module includes utility If you catch an exception that Python raises, the Python You can always insert Of course, once your script is at least half working, your
tag defines a
column like
, but also tags
it as a header column, which generally means it is rendered in a bold
font. By placing the input fields and labels in a table like this, we
get an input page like that shown in
Figure 15-10
. Labels and inputs are
automatically lined up vertically in columns, much as they were by the
tkinter GUI geometry managers we met earlier in this book.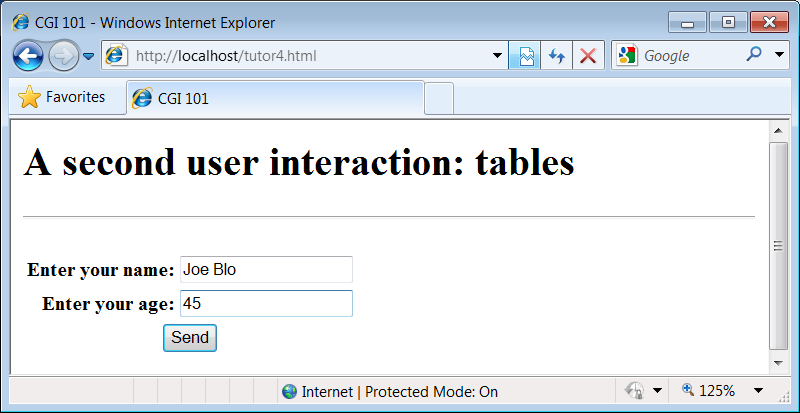
is pressed, it causes the script in
Example 15-10
to be executed on the
server machine, with the inputs typed by the user.#!/usr/bin/python
"""
runs on the server, reads form input, prints HTML;
URL http://server-name/cgi-bin/tutor4.py
"""
import cgi, sys
sys.stderr = sys.stdout # errors to browser
form = cgi.FieldStorage() # parse form data
print('Content-type: text/html\n') # plus blank line
# class dummy:
# def __init__(self, s): self.value = s
# form = {'user': dummy('bob'), 'age':dummy('10')}
html = """Greetings
%s
%s
%s
"""
if not 'user' in form:
line1 = 'Who are you?'
else:
line1 = 'Hello, %s.' % form['user'].value
line2 = "You're talking to a %s server." % sys.platform
line3 = ""
if 'age' in form:
try:
line3 = "Your age squared is %d!" % (int(form['age'].value) ** 2)
except:
line3 = "Sorry, I can't compute %s ** 2." % form['age'].value
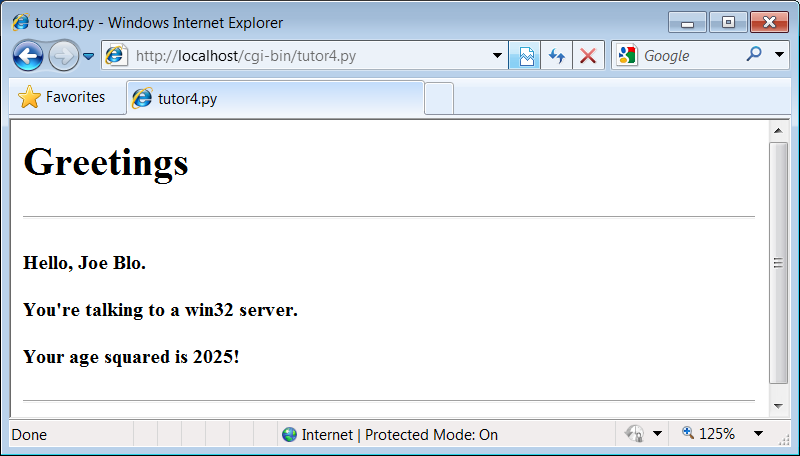
print(html % (line1, line2, line3))
CGI script. In fact, this script doesn’t do much new—it uses string
formatting to plug input values into the response page’s HTML
triple-quoted template string as before, this time with one line per
input field. When this script is run by submitting the input form page,
its output produces the new reply page shown in
Figure 15-11
.
a URL, too.
Figure 15-12
shows the page we get when passing auserandageexplicitly in this URL:http://localhost/cgi-bin/tutor4.py?user=Joe+Blow&age=30

?this time; we separate them with&. Also note that we’ve specified a blank
space in theuservalue with+. This is a common URL encoding convention.
On the server side, the+is
automatically replaced with a space again. It’s also part of the
standard escape rule for URL strings, which we’ll revisit later.
Example 15-10
doesn’t introduce much that is new about CGI itself, it does highlight a
few new coding tricks worth noting, especially regarding CGI script
debugging and security. Let’s take a quick look.
script echoes back the name of the server platform by
fetchingsys.platformalong with the square of theageinput field. Notice that theageinput’s value must be converted
to an integer with the built-inintfunction; in the CGI world, all inputs arrive as strings. We could
also convert to an integer with the built-inevalfunction.
Conversion (and other) errors are trapped gracefully in atrystatement to yield an error line,
instead of letting our
script die.evalto convert strings that were sent
over the Internet, like theagefield in this example, unless you can be absolutely sure that the
string does not contain even potentially malicious code. For
instance, if this example were available on the general Internet,
it’s not impossible that someone could type a value into theagefield (or append anageparameter to the URL) with a value
that invokes a system shell command. Given the appropriate context
and process permissions, when passed toeval, such a string might delete all the
files in your server script directory, or worse!
permissions and machine access, strings read off the Web can be
dangerous to run as code in CGI scripting. You should never pass
them to dynamic coding tools likeevalandexec, or to tools that run arbitrary shell
commands such asos.popenandos.system, unless you can be sure
that they are safe. Always use simpler tools for numeric conversion
likeintandfloat, which recognize only numbers, not
arbitrary Python code.
even in the brave new world of the Internet. Generally
speaking, debugging CGI scripts can be much more difficult than
debugging programs that run on your local machine. Not only do errors
occur on a remote machine, but scripts generally won’t run without the
context implied by the CGI model. The script in
Example 15-10
demonstrates the
following two common debugging tricks:sys.stderrtosys.stdoutso that Python
error messages wind up being displayed in the response page in
the browser. Normally, Python error messages are written tostderr, which generally
causes them to show up in the web server’s console window or
logfile. To route them to the browser, we must makestderrreference the same file object
asstdout(which is connected
to the browser in CGI scripts). If we don’t do this assignment,
Python errors, including program errors in our script, never
show up in the browser.dummyclass
definition, commented out in this final version, was used to
debug the script before it was installed on the Net. Besides not
seeingstderrmessages by
default, CGI scripts also assume an enclosing context that does
not exist if they are tested outside the CGI environment. For
instance, if run from the system command line, this script has
no form input data. Uncomment this code to test from the system
command line. Thedummyclass
masquerades as a parsed form field object, andformis assigned a dictionary
containing two form field objects. The net effect is thatformwill be plug-and-play
compatible with the result of acgi.FieldStoragecall. As usual in Python,
object interfaces, not datatypes, are all we must adhere
to.
scripts:
line
standalone will detect any syntax errors in your code. Recall
that a Python command line can run source code files regardless
of their extension: for example,pythonworks fine.
somescript.cgisys.stderrtosys.stdoutas early
as possible in your script
and stack dumps appear in your client browser when accessing the
script, instead of the web server’s console window or logs.
Short of wading through server logs or manual exception
handling, this may be the only way to see the text of error
messages after your script aborts.
context
interface (as done with thedummyclass in this script) to view
the script’s output for various test cases by running it from
the system command line.
[
61
]
Setting environment variables to mimic form or URL
inputs sometimes helps, too (we’ll see how later in this
chapter).
browser
functions that send a formatted dump of CGI
environment variables and input values to the browser, to view
in a reply page. For instance,cgi.print_form(form)prints all the
input parameters sent from the client, andcgi.test()prints environment
variables, the form, the directory, and more. Sometimes this is
enough to resolve connection or input problems. We’ll use some
of these in the webmail case study in the next chapter.
tracebacks
error message won’t be printed tostderr(that is normal behavior). In
such cases, it’s up to your script to display the exception’s
name and value in the response page; exception details are
available in the built-insysmodule, fromsys.exc_info().
In addition, Python’stracebackmodule
can be used to manually generate stack traces on
your reply page for errors; tracebacks show source-code lines
active when an exception occurred. We’ll use this later in the
error page in PyMailCGI (
Chapter 16
).
tracingprintstatements in your code, just as in normal Python programs. Be
sure you print the content-type header line first, though, or
your prints may not show up on the reply page. In the worst
case, you can also generate debugging and trace messages by
opening and writing to a local text file on the server; provided
you access that file later, this avoids having to format the
trace messages according to HTML reply stream
conventions.
best bet is likely to start running it live on the server, with
real inputs coming from a browser. Running a server locally on
your machine, as we’re doing in this chapter, can help by making
changes go faster as you
test.Other books