Authors: Edith Eig,Caroline Greeven
Mother of Purl (6 page)

A lot of new knitters are unwilling to learn the technical aspects of knitting. They come to the store and ask me, “How many stitches do I need to cast on?” My standard response is that I forgot my crystal ball at home. Without knowing how many stitches they get to an inch, there’s no way to answer their question. I find that 90 percent of the people are willing to knit a gauge, while just 10 percent will shrug their shoulders. It’s these few who come back with ill–fitting garments, even though they claim to have followed the directions in the pattern. Here are a few guidelines you can follow before beginning to knit to ensure you’ll obtain the right gauge.
[
EDITH KNIT TIP
]Your Mood Will Affect Your Gauge
Never knit a gauge when you are angry or stressed. This will affect how you knit and ultimately the size of your gauge.
- Try to use the yarn recommended in your pattern. If you want to substitute another yarn, make sure that the gauge indicated on the label is the same as the one described in the pattern. Ask your local knitting store for guidance if necessary. If the original yarn is available, compare your substitute to it. Read the labels to ensure they have the same characteristics: same stitch and row gauge.
- Read the yarn label carefully when selecting your needles as you will need to distinguish between European and U.S. sizes. European measurements will be given in metrics and will need to be converted to U.S. sizing. Labels will also list two sizes of needles with the first always two sizes smaller than the second. This is
not
a range of needles to be used. Rather, the first is the recommended size for the ribbing. The second, larger needle is the one to be used for the body of the garment. - Each pattern will indicate exactly what stitch and how many stitches to cast on to create a 4–by–4–inch swatch. When measuring the gauge, it is essential to measure the entire 4–inch width to get an accurate reading of both the number of stitches per inch as well as the number of rows per inch. If you cheat and measure only over a few stitches, you will not get an accurate measurement.
- If you don’t achieve your gauge with the recommended needle size, you can rectify this by adjusting the needle size, either going up or down a size. Remember to alter the size of the needle you use to work your rib.
You’re on your way. Soon enough you’ll be ready to tackle your first knitted garment.
[
EDITH KNIT TIPS
]Measuring Your Work
When you measure your work, make sure that the piece is completely flat. If need be, you may have to take some stitches off the needles to ensure there is no bunching as this will cause the garment to appear longer than it really is.
RIBBING
Ribbing is an essential part of the knitting process. In its most common form, ribbing is used to shape a garment, from hats to gloves to sweaters, and to create elasticity at the base of the sweater, cuffs, and neck. Although there are numerous patterns to create ribbing, the most common is the knit one, purl one rib.
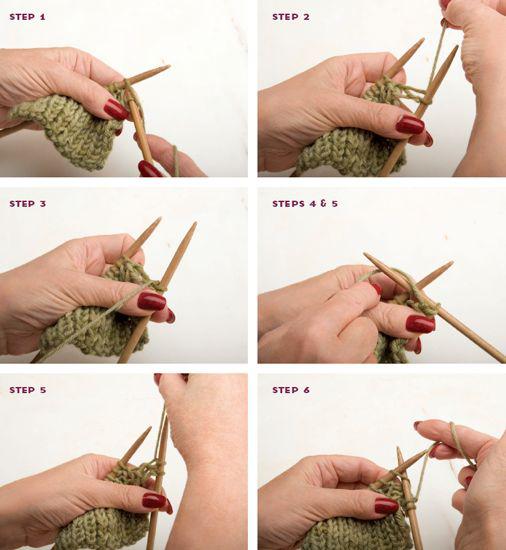
The key to mastering ribbing is to understand the way you move the yarn from the front to the back of your work, between the needles. To help my clients visualize and remember this basic two–step process, I use this image: Imagine that your needles form the posts of a door. You must move the yarn through the posts (or needles), not over them, before inserting the needle into the stitch. This will ensure that you don’t inadvertently create extra stitches.
STEP 1:
For example, in the knit one, purl one (K1, P1) rib, if your first stitch is a knit, bring your yarn to the back of your work and knit as usual.
STEP 2:
The next step will be a purl stitch; bring your yarn forward to the front of your work and purl the second stitch.
STEP 3–6:
Make sure that you are bringing the yarn
through the door,
not wrapping it over or behind the needles—the yarn should just be going back and forward between the needles without touching them. Simple, isn’t it? Now continue this pattern across the row.
There are a few obvious mistakes that can be made when knitting a rib, the most serious being when the knitter forgets which stitch to knit and which stitch to purl and gets “out of synch,” creating a row of seed stitches rather than ribbing. If this happens, the only solution is to rip. As long as you remember to purl the purl stitches and knit the knit stitches, you will be okay.
[
EDITH KNIT TIPS
]Changing Color While Ribbing
When changing colors within your ribbing, always start by knitting across the row and then rib on the wrong side. This will help to avoid seeing a line of color on the front of your work.
The next skill we are going to learn in this chapter is how to add shape to your knitting with increases and decreases. After all, how are you going to knit a sweater if you don’t know how to make it fit?
When you knit an increase, it widens your piece of knitting by one stitch, so by alternating rows with increases and rows without increases, you get a gradual widening that follows the shape of the body from the waist up toward the shoulders. Decreases do the opposite: they narrow your knitting.
There are several ways to increase and decrease, but for now we will cover the most basic and easiest technique.
Increasing
.
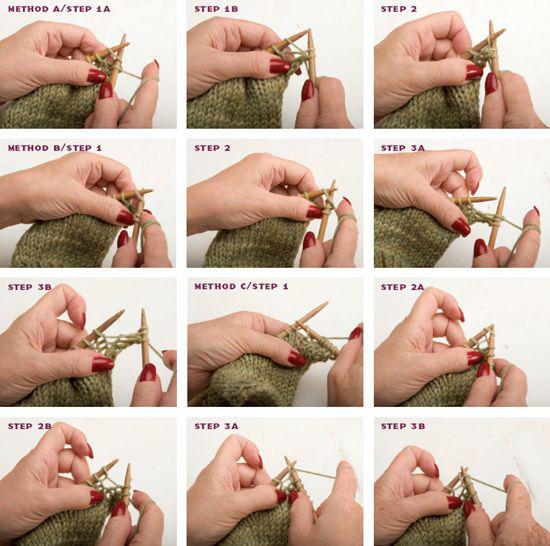
There are numerous ways to increase the number of stitches in your knitting. Increasing is usually done at the edges of your work. Here are the three most commonly used techniques:
METHOD A:
Step 1A & Step 1B Knit the stitch without removing the loop from the left–hand needle, Step 2 insert the needle into the back of the same stitch, knit it, and Step 3 remove the stitch from the needle.
METHOD B:
Step 1 Insert your needle into the stitch from the row below and twist it onto your left–hand needle; Step 2 knit that stitch and Step 3A/3B immediately knit the following stitch on the needle. I prefer this technique because it creates a smooth and even surface and won’t cause a noticeable disruption in the look of your knitting.
METHOD C:
The third way to increase is commonly called a “make one.” The advantage to this method is that it can be made anywhere across the row without distorting the look of your work, whereas the two methods previously discussed should only be used at the beginning or end of a row. To create a make one, knit across the row to the point where you want to
increase. Look at the knitting between the stitch on your left–hand needle and the stitch on your right–hand needle; you’ll clearly see a “bar.” Step 1, with your right–hand needle, pick the bar from behind and Step 2A transfer to left–hand needle, Step 2B then Step 3A/3B, insert the point of your right–hand needle through the back loop and knit it.
Decreasing
.
There are several methods of decreasing, the goal of which is to eliminate one or more stitches from your work. The most important thing about decreasing is that you need to change your method depending on where you need to decrease in your knitting. This is because decreasing affects the look of your knitting and is directional. If you use decreases correctly, they can add a polished look to your work. Use them incorrectly and they will be ugly and obvious. Choose your decrease technique based on whether you are working on the left or right side of your work.
- Knit two together (K2tog): This is the easiest way to decrease, and the decrease will slant to the right.
- Purl two together (P2tog): Insert the right–hand needle through the next two stitches and purl them together.
- Slip one, knit one, pass slipped stitch over (SL1, K1, PSSO): Slip a stitch as if to purl (or purlwise), knit the next stitch, and pass the slipped stitch over the previously knitted stitch. The decrease will slant to the left.
- Binding off as a method of decreasing: I’m often asked, “Why do I bind off instead of decreasing?” The difference is that binding off is eliminating more than one consecutive stitch and can only be done at the beginning of a row. For example, when shaping the armhole of a sweater, you will bind off at the beginning of a knit row for the right armhole and at the beginning of the purl row for the left armhole. Even though a decrease of a single stitch is generally done at the beginning of a row, it can also be used anywhere throughout the row.
- Full fashion decreases: This means that the decreases on the armholes and sleeves have been knitted in such a way that they become a design feature, outlining the shaping of the separate pieces of knitting. To do this you will generally want to work your decreases only on the knit rows, and work all decreases two stitches in from the edge of your knitting. On the right side you will use K2tog, and on the left side you will use the slip one, knit one, pass slipped stitch over method.
[
EDITH KNIT TIPS
]Increasing on the Second Stitch
I always tell my clients to increase on the second stitch rather than the first as this leaves you with a neater edge. It will also come in handy when it comes time to sew your sweater together.

[
EDITH KNIT TIPS
]Using a Cable Needle Correctly
If you use a hook cable needle, make sure to remove the stitches from the left–hand needle with the short side and knit the stitches from the left–hand needle with the long side. By doing this, the stitches will automatically be twisted and face the correct direction.
One technique that scares people the most is cabling. Well, you need not be frightened as this is one of the easiest of all to master. In a pattern a simple cable is very often referred to as a “4–stitch cable,” “6–stitch cable,” or “12–stitch cable.” This indicates how many stitches will be involved in the cable process. When cabling, you will also need a spare needle, called an auxiliary or cable needle, a needle that has a bend or hook feature.
Here’s an example of how to cable. Let’s say that the pattern calls for a 6–stitch cable. To make a “back cable,” which will form a slant to the right, follow this simple step:
With the tip of your cable needle, remove 3 stitches from your left–hand needle and let them rest in the curve of your cable needle; place them in the back of your work. Knit the 3 stitches on your left–hand needle, then knit the 3 from your cable needle. The cable is made.