Mother of Purl (4 page)
Authors: Edith Eig,Caroline Greeven

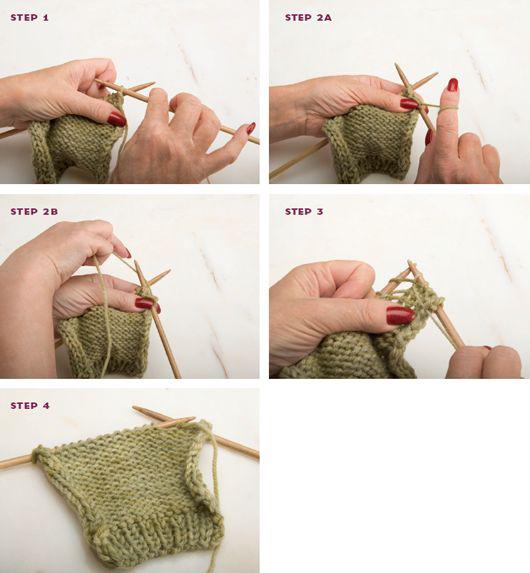
STEP 3:
Down the Cellar:
In a downward motion, gently pull the right–hand needle back through the loop that is still attached to your left–hand needle.
STEP 4:
And off You Go:
With your right–hand needle, gently pull the stitch off the left–hand needle, carefully avoiding accidentally pulling other stitches off the left–hand needle.
Congratulations! You have just knitted your first stitch.
MEGAN MULLALLY
An artist at heart, Megan would spend hours wandering the shop searching for all the right yarns—not just the right yarn, because every project of Megan’s was an intricate mix of yarns: thick and thin and all color shades. From scarves to ponchos, her pieces were unusual and beautiful.
Tension
.
By maintaining consistent tension in your knitting, you will create even and uniform stitches as you pass them from one needle to the other.
Purling
.
The purl stitch is basically the reverse of the knit stitch. Follow these easy steps to master the purl stitch.
[
EDITH KNIT TIPS
]Recognizing a Knit Stitch from a Purl Stitch
Working in combination of knit one row, purl one row is referred to as stockinette. Knitting every row is called the garter stitch. Here’s an easy way to recognize your stitches. When you work in stockinette, you knit the front of your work, which will be smooth; each stitch will look like a V. This side is also referred to as the “right side.” On the reverse side, or “wrong side,” you will purl; this row will form a series of little bumps like beads or “pearls.” (The one exception is the garter stitch, which forms little bumps on both sides of the work, regardless of knitting or purling each row. This will also help you to recognize the “right” and “wrong” sides of the cast–on edge.)

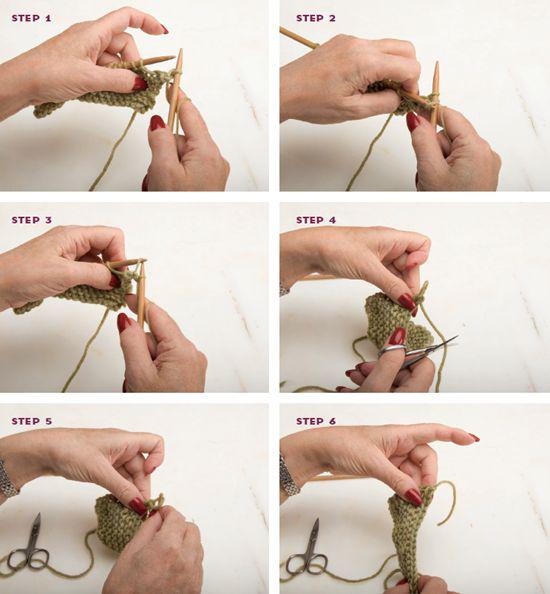
STEP 1:
With your yarn in front of the right–hand needle, insert the tip of the right–hand needle through the loop, from the top downward. You’ve now formed an X.
STEP 2:
With your right hand, take the yarn and place it over the top of the right–hand needle in a counterclockwise motion through the X.
STEP 3:
Place the right–hand needle beneath the stitch on the left–hand needle and pull the yarn through the loop.
STEP 4:
Pull off the stitch. Congratulations, you’ve just purled.
I have many clients who have knitted for years and are still intimidated by the purl stitch, professing that they will learn it “next week.” It may take someone years before they finally attempt it. Purling may feel awkward, but it’s very simple. Once you learn to purl, and feel comfortable with the stitch, you will be able to develop your skills beyond that “professional beginner” giveaway: the knit stitch scarf, commonly referred to as the garter stitch.
PURLING PROBLEMS
If you find purling difficult, take comfort in the fact that many of my celebrity clients have been just as puzzled by it. One of my favorite knitters is Sofia Coppola. She came in one afternoon, and I taught her how to knit, and because she was ambitious we covered purling as well. She purchased her yarn and left. A few days later I received a frantic phone call: it was Sofia, on the beach in Jamaica—with her knitting in a tangle on her lap. She had forgotten how to purl. I talked her through the stitch on the phone, and after half an hour she hung up. She finished her scarf and it was lovely.
When you start to purl, everything feels upside down. The most important thing to remember is that you throw your yarn toward the floor rather than up and around.
Before you cast on for your first project, practice knitting and purling. The more relaxed and confident you are, the better you will knit.
Binding Off
.
Last, but not least, is the final essential: binding off. Binding off is the process of ending and securing your work by interlocking your stitches to prevent them from unraveling and running. It is also used to shape your work, including necks and armholes.
Before you bind off your stitches, look at the cast–on row of your knitting, which is the first bottom row, to determine the “right” and “wrong” side of your knitting.
STEP 1:
As you bind off, work the first two stitches in pattern.
STEP 2:
You will now have two stitches on your right–hand needle.
STEP 3:
Using the tip of the left–hand needle, pass the first stitch over the second stitch, letting it drop off the right–hand needle.
STEP 4:
Continue working in this fashion until you’ve completed the row.
STEP 5:
When you have one final stitch remaining on your right–hand needle, cut your yarn, leaving a six–inch tail.
STEP 6:
Pull the tail through the loop of the stitch to secure it.
When working in pattern, make sure to bind off in the same pattern as this will ensure continuity and elasticity in your work.
[
EDITH KNIT TIPS
]Bind Off Loosely
When binding off, be sure to do so loosely; otherwise you risk “puckering” your work. I often recommend to my clients that they bind off using a needle one size larger than the one they’ve been knitting with.
Watch Out for Knots and Adding a Ball of Yarn
On occasion, you may find a knot in your yarn as you knit. It’s important not to continue knitting at this point, working the knot into the row, because the knot may open, resulting in a hole in your work, or it may appear on the “right” side of your work. Instead, undo your stitches to the beginning of the row, open the knot, and attach the two ends with a slipknot, leaving a minimum of six inches that you will weave into your work later on as part of the finishing. Don’t assume that expensive yarn won’t have a knot in it. Even giants have feet of clay.
When adding a new ball of yarn to your work, the same rule applies: attach with a slipknot at the end of the row, leaving a six–inch tail to weave in later.
While you’re working on your project, you may notice what appears to be a “run” in your knitting—a loop of a stitch sticking out from the body of your work. Above this stitch you’ll notice little bars, like rungs on a ladder. It’s important to prevent the stitch(es) from running farther down your work and potentially ruining your project. (If you are unable to deal with the stitch immediately, secure it with a safety pin to stop it from running.) As swiftly as possible, catch the loop with either your needle or a crochet hook. Don’t panic. No matter how bad it may look, or how far down in your knitting it has run, in most instances it can be repaired. You’ll now begin the process of picking up your dropped stitch(es). Essentially you will be reknitting your fabric.
There are several ways to pick up a dropped stitch, and here are a few suggestions. Some people use a crochet hook to weave the loop up, but I, however, find my knitting needles to be a much more efficient way of doing this because you are applying the same techniques and motions as in knitting.
[
EDITH KNIT TIP
]Saving a Dropped Stitch
If you drop more than one stitch, you’ll want to pick them up one at a time, after placing the other dropped stitches on a safety pin.
Picking Up a Dropped Knit Stitch
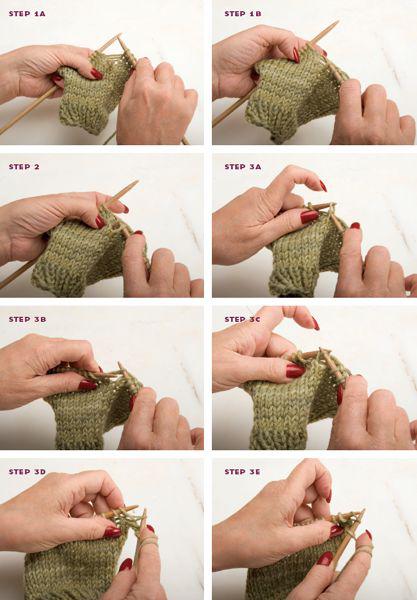
STEP 1 A–B:
Insert the tip of your right–hand needle into the front of the dropped stitch.
STEP 2:
With your left hand, separate the rungs of your ladder, working the rung closest to the dropped stitch first. Insert the tip of the right–hand needle under the rung.
STEP 3 A–E:
Insert the tip of your left–hand needle through the stitch on the back of the stitch on your right–hand needle, pulling it through as if to bind off. Repeat this process until you’ve repaired your work.
Picking Up a Dropped Garter Stitch
.
This is why as I mentioned earlier, it’s important to be able to recognize your knit and purl stitches.
STEP 1:
Even though for a garter stitch you knit every row, the ridge formed by doing so consists of a combination of knit and purl. If you look carefully at your ridge, you’ll see the bottom line forming a “V” while the top part looks like a purl. The first step is to look at the first rung and to recognize if the stitch dropped from the knit or the purl ridge. Place the dropped stitch on your left–hand needle. Insert the tip of the right–hand needle into the stitch as if to purl and at the same time, under the rung, pulling it through. The stitch is picked up. Resume your work.
There is nothing worse than looking at your knitting and realizing you have made a “big” mistake. Maybe you knitted where you should have purled, neglected to increase, or just knitted a piece longer than it needed to be. In any case, you are going to have to undo or rip out your knitting to the point where you made your mistake, fix the error, and continue forward. More than any other aspect of knitting, ripping is frustrating and annoying.