iOS Programming: The Big Nerd Ranch Guide, 3/e (Big Nerd Ranch Guides) (59 page)
Read iOS Programming: The Big Nerd Ranch Guide, 3/e (Big Nerd Ranch Guides) Online
Authors: Aaron Hillegass,Joe Conway
Tags: #COM051370, #Big Nerd Ranch Guides, #iPhone / iPad Programming

Now,
ItemsViewController
needs to change
showImage:atIndexPath:
to grab the
BNRItem
associated with the cell whose button was tapped and display its image in a
UIPopoverController
.
To display an image in a popover, you need a
UIViewController
whose
view
shows an image as the popover’s content view controller. Create a new
UIViewController
subclass from the
UIViewController
template. Name this new class
ImageViewController
, select
UIViewController
as its superclass, and check only the
With XIB for user interface
box.
Open
ImageViewController.xib
. First, drag a
UIScrollView
onto the
View
. Then, drag a
UIImageView
onto the
UIScrollView
.
Figure 15.11 ImageViewController XIB
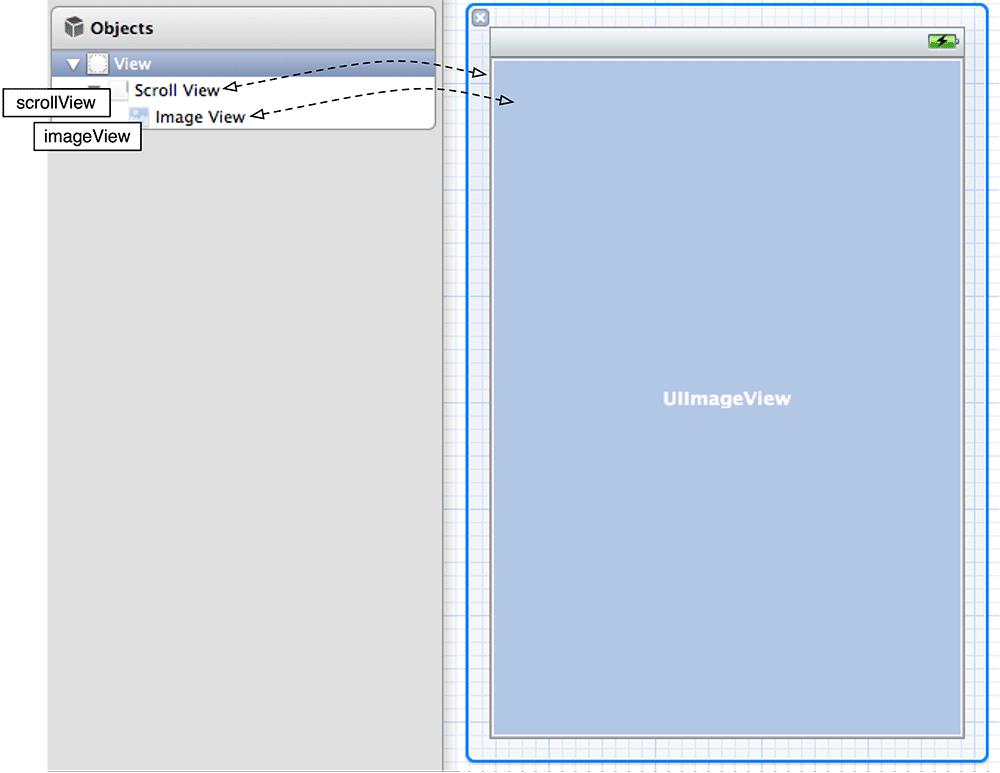
One of the issues of configuring a XIB file that has views stacked on top of each other is that it is difficult to select the views that are totally obscured. When this happens, you can make connections by dragging from the objects in the outline view instead of their visual representations on the canvas.
In
ImageViewController.h
, add curly brackets to
ImageViewController
’s interface and then make the connections shown in
Figure 15.11
. These connections should be instance variable outlets with weak storage.
Now add a property in
ImageViewController.h
to hold the image.
{
__weak IBOutlet UIImageView *imageView;
__weak IBOutlet UIScrollView *scrollView;
}
@property (nonatomic, strong) UIImage *image;
@end
When an instance of
ImageViewController
is created, it will be given an image. Anytime it is displayed, it will resize its
imageView
to fit the image and tell its
scrollView
to update its content size to match. In
ImageViewController.m
, synthesize the
image
property and implement
viewWillAppear:
to configure the views.
@synthesize image;
- (void)viewWillAppear:(BOOL)animated
{
[super viewWillAppear:animated];
CGSize sz = [[self image] size];
[scrollView setContentSize:sz];
[imageView setFrame:CGRectMake(0, 0, sz.width, sz.height)];
[imageView setImage:[self image]];
}
@end
Now you can finish implementing
showImage:atIndexPath:
. First, in
ItemsViewController.h
, declare that
ItemsViewController
conforms to
UIPopoverControllerDelegate
and give it an instance variable to hold the popover.
UIPopoverController *imagePopover;
}
Next, import the appropriate header files at the top of
ItemsViewController.m
.
#import "ImageViewController.h"
Flesh out the implementation of
showImage:atIndexPath:
to present the popover controller that displays the full-size image for the
BNRItem
represented by the cell that was tapped.
{
NSLog(@"Going to show the image for %@", ip);
if ([[UIDevice currentDevice] userInterfaceIdiom] == UIUserInterfaceIdiomPad) {
// Get the item for the index path
BNRItem *i = [[[BNRItemStore sharedStore] allItems] objectAtIndex:[ip row]];
NSString *imageKey = [i imageKey];
// If there is no image, we don't need to display anything
UIImage *img = [[BNRImageStore sharedStore] imageForKey:imageKey];
if (!img)
return;
// Make a rectangle that the frame of the button relative to
// our table view
CGRect rect = [[self view] convertRect:[sender bounds] fromView:sender];
// Create a new ImageViewController and set its image
ImageViewController *ivc = [[ImageViewController alloc] init];
[ivc setImage:img];
// Present a 600x600 popover from the rect
imagePopover = [[UIPopoverController alloc]
initWithContentViewController:ivc];
[imagePopover setDelegate:self];
[imagePopover setPopoverContentSize:CGSizeMake(600, 600)];
[imagePopover presentPopoverFromRect:rect
inView:[self view]
permittedArrowDirections:UIPopoverArrowDirectionAny
animated:YES];
}
}
Finally, in
ItemsViewController.m
, get rid of the popover if the user taps anywhere outside of it .
{
[imagePopover dismissPopoverAnimated:YES];
imagePopover = nil;
}
Build and run the application. Tap on the thumbnails in each row to see the full-size image in the popover. Tap anywhere else to dismiss the popover.
If a
BNRItem
is worth more than $50, make its value label text appear in green. If it is worth less than $50, make it appear in red.
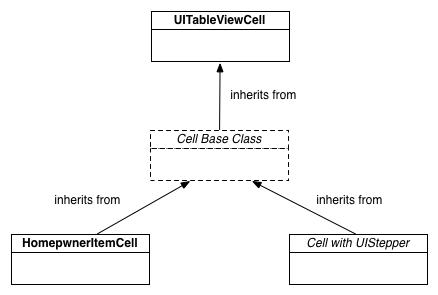
The need for a cell to forward an action message to its controller is pretty common. If your cell subclasses inherit this ability, then you don’t have to re-implement this functionality in each subclass. Make a
UITableViewCell
subclass as a cell base class that just implements the ability to forward action messages to a controller. Make
HomepwnerItemCell
a subclass of this base class. To test your base class further, create another subclass of it that has a
UIStepper
on it that will adjust the value of a
BNRItem
.
Figure 15.12 Cell class hierarchy
The
ImageViewController
should center its image and allow zooming. Implement this behavior in
ImageViewController.m
.
Core Data
When deciding between approaches to saving and loading for iOS applications, the first question is typically
“
Local or remote?
”
If you want to save data to a remote server, this is typically done with a web service. Web services are covered in
Chapter 25
, so let’s assume that you want to store data locally. The next question is typically
“
Archiving or Core Data?
”
At the moment,
Homepwner
uses keyed archiving to save item data to the filesystem. The biggest drawback to archiving is its all-or-nothing nature: to access anything in the archive, you must unarchive the entire file; to save any changes, you must rewrite the entire file. Core Data, on the other hand, can fetch a small subset of the stored objects. And if you change any of those objects, you can update just that part of the file. This incremental fetching, updating, deleting, and inserting can radically improve the performance of your application when you have a lot of model objects being shuttled between the filesystem and RAM.
Core Data is a framework that provides
object-relational mapping
. In other words, Core Data can turn Objective-C objects into data that is stored in a SQLite database file and vice-versa. SQLite is a relational database that is stored in a single file. (Technically, SQLite is the library that manages the database file, but we use the word to mean both the file and the library.) It is important to note that SQLite is not a full-fledged relational database server like Oracle, MySQL, or SQLServer, which are their own applications that clients can connect to over a network.
Core Data gives us the ability to fetch and store data in a relational database without having to know SQL. However, you do have to understand a bit about how relational databases work. This chapter will give you that understanding as you replace keyed archiving with Core Data in
Homepwner
’s
BNRItemStore
.
Your
Homepwner
application currently uses archiving to save and reload its data. For a moderately sized object model (say, fewer than 1000 objects), this is fine. As your object model gets larger, however, you will want to be able to do incremental fetches and updates, and Core Data can do this.
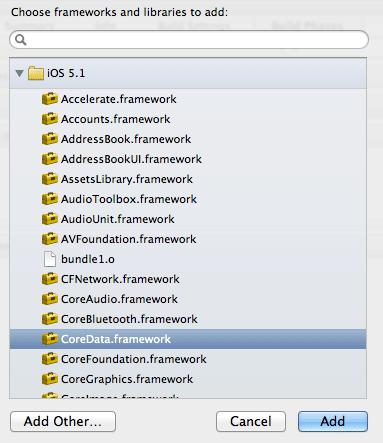
The very first step is to add the Core Data framework to your project. Select the
Homepwner
target and under
Build Phases
, open the
Link Binary With Libraries
build phase. Click the
+
button to add the Core Data framework.
Figure 16.1 Add Core Data framework
In a relational database, we have something called a
table
. A table represents some type; you can have a table of people, a table of a credit card purchases, or a table of real-estate listings. Each table has a number of columns to hold pieces of information about that thing. A table that represents people might have a column for the person’s name, social security number, height, and age. Every row in the table represents a single person.
Figure 16.2 Role of Core Data
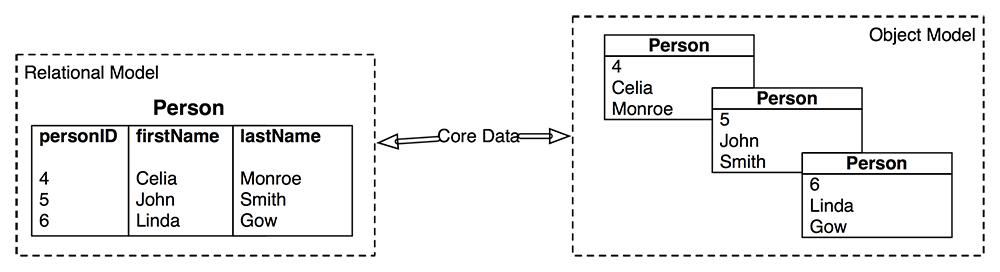
This organization translates well to Objective-C. Every table is like an Objective-C class. Every column is one of the class’s instance variables. Every row is an instance of that class. Thus, Core Data’s job is to move data to and from these two organizations (
Figure 16.2
).
Core Data uses different terminology to describe these ideas: a table/class is called a
entity
, and the columns/instance variables are called
attributes
. A Core Data model file is the description of every entity along with its attributes in your application. In
Homepwner
, you’re going to describe a
BNRItem
entity in a model file and give it attributes like
itemName
,
serialNumber
, and
valueInDollars
.
Open
Homepwner.xcodeproj
. From the
File
menu, create a new file. Select
Core Data
in the
iOS
section and create a new
Data Model
. Name it
Homepwner
.
Figure 16.3 Create the model File
This will create a
Homepwner.xcdatamodeld
file and add it to your project. Select this file from the project navigator, and the editor area will reveal the user interface for manipulating a Core Data model file.
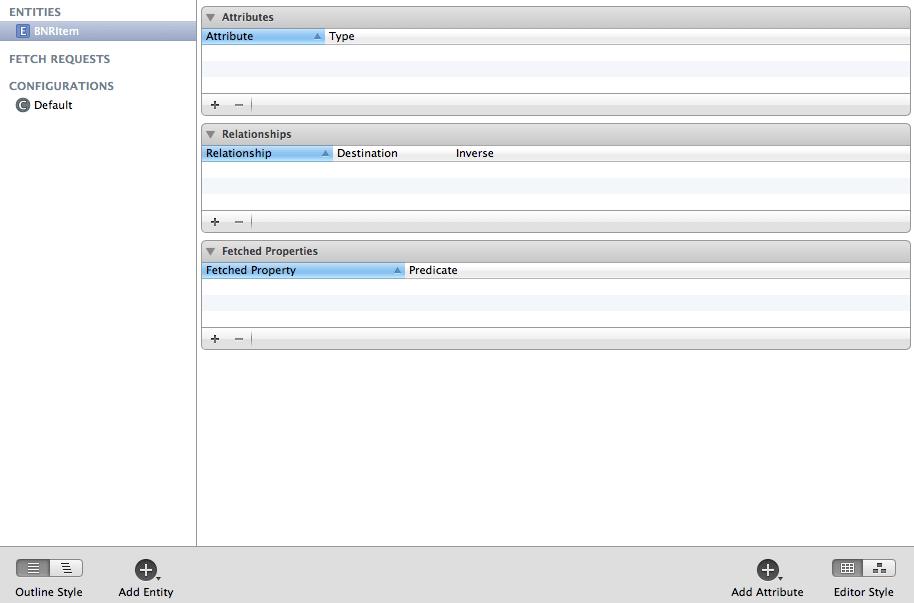
Find the
Add Entity
button at the bottom left of the window and click it. A new
Entity
will appear in the list of entities in the lefthand table. Double-click this entity and change its name to
BNRItem
(
Figure 16.4
).
Figure 16.4 Create the BNRItem entity
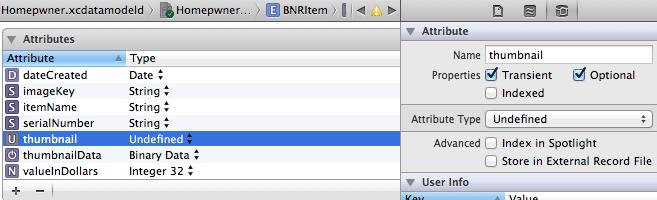
Now your
BNRItem
entity needs attributes. Remember that these will be the instance variables of the
BNRItem
class. The necessary attributes are listed below. For each attribute, click the
+
button in the
Attributes
section and edit the
Attribute
and
Type
values:
- itemName
is a
String
- serialNumber
is a
String
- valueInDollars
is an
Integer 32
- dateCreated
is a
Date
- imageKey
is a
String
- thumbnailData
is a
Binary Data
- thumbnail
is an
Undefined
(It’s a
UIImage
, but that isn’t one of the possibilities.)
Select
thumbnail
from the
Attributes
list and then click the icon in the inspector selector to show the
data model inspector
. Check the box for
Transient
(
Figure 16.5
; you can also verify your attributes with this figure). Making this attribute transient lets Core Data know that
thumbnail
will be created at runtime instead of saved and loaded from the file. instead.
Figure 16.5 BNRItem attributes and the data model inspector
There is one more attribute to add. In
Homepwner
, users can order items by changing their positions in the table view. Archiving items in an array naturally respects this order. However, relational tables don’t order their rows. Instead, when you fetch a set of rows, you specify their order using one of the attributes (
“
Fetch me all the
Employee
objects ordered by
lastName
.
”
).
To maintain the order of items, you need to create an attribute to record each item’s position in the table view. Then when you fetch items, you can ask for them to be ordered by this attribute. (You’ll also need to update that attribute when the items are reordered.) Create this final attribute: name it
orderingValue
and make it a
Double
.
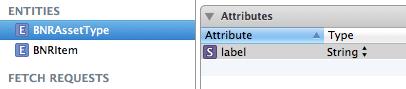
At this point, your model file is sufficient to save and load items. However, one of the benefits to using Core Data is that entities can be related to one another, so we’re going to add a new entity called
BNRAssetType
that describes a category of items. For example, a painting might be of the
Art
asset type.
BNRAssetType
will be an entity in the model file, and each row of that table will be mapped to an Objective-C object at runtime.
Add another entity called
BNRAssetType
to your model file. Give it an attribute called
label
of type
String
. This will be the name of the category the
BNRAssetType
represents.
Figure 16.6 Create the BNRAssetType entity
Now, you need to establish relationships between
BNRAssetType
and
BNRItem
. Relationships between entities are mapped as pointers. There are two kinds of relationships:
to-many
and
to-one
. When an entity has a to-one relationship, each instance of that entity will have a pointer to an instance in the entity it has a relationship to. For example, the
BNRItem
entity will have a to-one relationship to the
BNRAssetType
entity. Thus, a
BNRItem
instance will have a pointer to a
BNRAssetType
instance.
When an entity has a to-many relationship, each instance of that entity has a pointer to an
NSSet
. This set contains the instances of the entity that it has a relationship with. For example, the
BNRAssetType
entity will have a to-many relationship to
BNRItem
because many
BNRItem
s can have the same
BNRAssetType
. Thus, a
BNRAssetType
object will have a set of all the
BNRItem
s that are its type of asset.