iOS Programming: The Big Nerd Ranch Guide, 3/e (Big Nerd Ranch Guides) (58 page)
Read iOS Programming: The Big Nerd Ranch Guide, 3/e (Big Nerd Ranch Guides) Online
Authors: Aaron Hillegass,Joe Conway
Tags: #COM051370, #Big Nerd Ranch Guides, #iPhone / iPad Programming

Sometimes, it is useful to add a
UIControl
or one of its subclasses, like a
UIButton
, to a
UITableViewCell
. For instance, we want users to be able to tap the thumbnail image in a cell and see a full-size image for that item. In this section, we’ll do that by adding a clear button on top of the thumbnail. Tapping this button will show the full-size image in a
UIPopoverController
when the application is running on an iPad.
Open
HomepwnerItemCell.xib
and drag a
UIButton
on top of the
UIImageView
that is already there. Resize this button to match the exact width and height of the
UIImageView
.
Then, Option-click on
HomepwnerItemCell.h
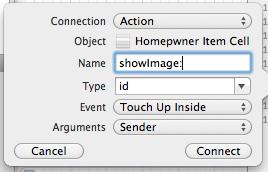
to open it in the assistant editor. Control-drag from the button to the method area of this file and configure this connection as shown in
Figure 15.9
.
Figure 15.9 Button connection
This connection will add the following code to
HomepwnerItemCell.h
.
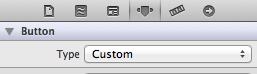
Obviously, we don’t want this button to obscure the image underneath it. In the attributes inspector, change the button’s type to
Custom
(
Figure 15.10
).
Figure 15.10 Setting a UIButton’s type
A custom button doesn’t do any drawing by default (unlike, for example, a rounded rectangle button that draws a white pill with a blue outline). This means it starts out as a transparent button with nothing on it. If we wanted to, we could use an image or subclass
UIButton
and override
drawRect:
to give this button a totally custom look. But in our case, we just want a transparent button, so we’re done.
At this point, though, we run into a problem: the action message of the button will be sent to the
HomepwnerItemCell
. But
HomepwnerItemCell
is not a controller and doesn’t have access to any of the image data necessary to get the full-size image. In fact, it doesn’t even have access to the
BNRItem
whose thumbnail it is displaying.
We could consider letting
HomepwnerItemCell
keep a pointer to the
BNRItem
it displays. But, table view cells are view objects, and they shouldn’t manage model objects or be able to present additional interfaces (like the
UIPopoverController
).
So our plan, instead, is to give
HomepwnerItemCell
a pointer to
ItemsViewController
. (
ItemsViewController
is the controller object that manages the
UITableView
that
HomepwnerItemCell
s belong to, so it is also the controller of every
HomepwnerItemCell
.) Then, when the
HomepwnerItemCell
receives the action message from the button, it will send a new message to the
ItemsViewController
so that the controller can fetch the image and present it in the
UIPopoverController
.
Now we need to give
HomepwnerItemCell
that pointer to the controller as well as a pointer to the table view that the cell belongs to. In
HomepwnerItemCell.h
, add the following two properties.
@property (weak, nonatomic) UITableView *tableView;
These properties are weak because the
HomepwnerItemCell
is owned by its
tableView
already. Its
tableView
is owned by its
controller
. Thus, making either of these properties strong references would create a retain cycle because a child (the cell) would have a strong reference to its parent (the
UITableView
) or its grandparent (the controller).
In
HomepwnerItemCell.m
, synthesize these properties.
@synthesize tableView;
Now we need to set these properties when the cell is created. In
ItemsViewController.m
, locate the
tableView:cellForRowAtIndexPath:
method and add the following code.
dequeueReusableCellWithIdentifier:@"HomepwnerItemCell"];
[cell setController:self];
[cell setTableView:tableView];
[[cell nameLabel] setText:[p itemName]];
Why do we need to give the cell a pointer to the table view when the controller already has a pointer to that table view? Wouldn’t it be simpler just to have the cell pass itself and let the controller determine the table view? Yes, it would. But we’re doing it this way so that, later in the chapter, the cell can pass its own index path to enable some cool Objective-C techniques. And serious bonus points for having these questions.)
Every cell will now know its controller and the table view it is displayed on. When the message
showImage:
is sent to a
HomepwnerItemCell
, we want the
HomepwnerItemCell
to turn around and tell the
ItemsViewController
to show the image for the item at the cell’s index path.
In
HomepwnerItemCell.m
, implement
showImage:
to get its index path from the table view and then send its controller the
showImage:atIndexPath:
message. (We’ll get to the implementation of
showImage:atIndexPath:
in a moment.)
{
NSIndexPath *indexPath = [[self tableView] indexPathForCell:self];
[[self controller] showImage:sender
atIndexPath:indexPath];
}
Now, whenever the button overlaid on the thumbnail is tapped,
ItemsViewController
will be sent
showImage:atIndexPath:
. The first argument is a pointer to the button that sent the original
showImage:
message, and the second argument is the
NSIndexPath
of the cell that this button is on. At least that is what should happen. Unfortunately,
HomepwnerItemCell
doesn’t know the details of
ItemsViewController
. Thus, it doesn’t know that
ItemsViewController
implements
showImage:atIndexPath:
, and this code will generate an error.
One approach would be to import
ItemsViewController.h
into
HomepwnerItemCell.m
. However, this creates a dependency between
HomepwnerItemCell
and
ItemsViewController
and
HomepwnerItemCell
could not be used with any other view controller. Let’s take a different approach that will keep the two classes separate and give us some flexibility down the road.
We can use the flexible power of Objective-C’s runtime messaging to generalize the implementation of
showImage:
. Instead of explicitly sending
showImage:atIndexPath:
to the controller when
showImage:
is called, we are going to send the message
performSelector:withObject:withObject:
. This method takes a
SEL
that is the selector of the message to be sent, and the next two arguments are the arguments to be passed in that message (in order). The controller then searches for the method whose name matches the passed-in selector and executes it.
This is an interesting way of doing things, but we’ll see why it is useful in a moment. First, remember that a selector is just the name of a message. You can turn a selector into a string, and you can turn a string back into a selector. In between these two steps, you can modify the string that becomes the selector. This is what you will do for
HomepwnerItemCell
– when it is sent the message
showImage:
, it will get that selector, append
atIndexPath:
to it, and send the new selector to its controller in
performSelector:withObject:withObject:
. The two arguments will be the sender of
showImage:
and the cell’s index path.
In
HomepwnerItemCell.m
, modify the implementation of
showImage:
to construct the selector and send this information to the controller.
{
// Get this name of this method, "showImage:"
NSString *selector = NSStringFromSelector(_cmd);
// selector is now "showImage:atIndexPath:"
selector = [selector stringByAppendingString:@"atIndexPath:"];
// Prepare a selector from this string
SEL newSelector = NSSelectorFromString(selector);
NSIndexPath *indexPath = [[self tableView] indexPathForCell:self];
// Ignore warning for this line - may or may not appear, doesn't matter
[[self controller] performSelector:newSelector
withObject:sender
withObject:indexPath];
}
(As you might expect, there’s also
performSelector:
for messages with no arguments,
performSelector:withObject:
for messages with one argument, and so on for all the possible message sends.)
At this point, we hope your Objective-C programmer warning sirens are going off. Are you thinking,
“
If we can just invent messages to send, then isn’t it too easy to send a message that an object won’t respond to?
”
With great power comes great responsibility. Only you can prevent unrecognized selector exceptions by checking with the receiver first.
In
HomepwnerItemCell.m
, check to see if the controller implements
showImage:atIndexPath:
first.
{
NSString *selector = NSStringFromSelector(_cmd);
selector = [selector stringByAppendingString:@"atIndexPath:"];
SEL newSelector = NSSelectorFromString(selector);
NSIndexPath *indexPath = [[self tableView] indexPathForCell:self];
if (indexPath) {
if ([[self controller] respondsToSelector:newSelector]) {
// Ignore warning for this line - may or may not appear, doesn't matter
[[self controller] performSelector:newSelector
withObject:sender
withObject:indexPath];
}
}
}
Let’s verify this all works according to plan. In
ItemsViewController.m
, implement
showImage:atIndexPath:
to print out the index path.
{
NSLog(@"Going to show the image for %@", ip);
}
Build and run the application. Tap a thumbnail (or, more accurately, the clear button on top of the thumbnail) and check the message in the console.
All of this code may seem like overkill, and for one message, it really is. However, this approach has bought us two things: the decoupling the cell from the controller and a general purpose format for cells to relay messages to their controller. In the Silver Challenge for this exercise, you will see how easy it is to use this technique in a general way to give all of your cells the ability to relay messages.