Canning and Preserving For Dummies (35 page)
Read Canning and Preserving For Dummies Online
Authors: Amelia Jeanroy

 Fish and seafood differ from other meats because they are extremely low in acidity, which means that there is an even greater chance of error if you don’t follow the recipe carefully. Because of the increased chance of error, canning fish is not the best project for a beginner. Try canning some other foods first. When you feel proficient with canning easier items (like fruits and vegetables), move up to meats, and then to fish and seafood.
Picking your fish
When canning fish, use a mild-flavored fish from clean waters. With fishing being a sport that requires an inexpensive license and a worm on a pole, you may find that fishing can fill a pantry for little to no cost.
 Check with your local health department for official warnings and recommendations about eating freshly caught fish in your area.
Preparing fish and seafood
To prepare fish, you clean and scale it, but you don’t remove the skin. You don’t have to remove the tiny bones, either (they’ll become soft and edible when canned). Then you cut it into pieces long enough to fill the jar and leave 1-inch headspace. If cutting chunks is desired, simply cut into pieces roughly the same size, again leaving 1-inch headspace.
 To measure how long to cut your fish pieces, place the size jar you are using alongside a fillet of fish.
Filling the jar
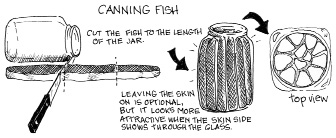
Place the fish pieces into pint jars, skin side facing out (for a prettier finished jar), and leave 1-inch headspace, as shown in Figure 11-2. (Fish is not suitable for quart canning.)
Figure 11-2:
Place fish skin side out in jar.
Fish and seafood need to be canned as quickly as possible — preferably the day it’s caught. If you want to can either of these foods, make a plan that includes the actual trip out to catch them. That way, your supplies are organized and ready to use when you return to the kitchen. When you have a basket of fish waiting to be canned, that is no time to be looking for your canning tongs.
Canned Freshwater Fish
This recipe is one that my family loves. I (Amy) use it primarily as the base for a quick fish chowder. On a cold night, it tastes wonderful with crusty bread and a canned fruit on the side.
Preparation time:
1 hour
Processing time
: 1 hour 40 minutes
Pressure level
: 10 pounds
Yield
: 12 pints
25 pounds fresh fish
Canning salt
1
Prepare the canning jars and two-piece caps (lids and screw bands) according to the manufacturer’s instructions. Keep the jars and lids hot. (For detailed instructions on preparing your jars, see Chapter 4.)
2
Clean the fish, removing the entrails, scales, head, tail, and fins. Leave the skin intact. Cut the pieces of cleaned fish to fit the jars minus 1 inch for the required headspace; see Figure 11-2.
3
Fill the hot jars with fish, skin side out (refer to Figure 11-2) and add 1 teaspoon salt to each jar. Wipe the jar rims; seal the jars with the two-piece caps, hand-tightening the bands.
4
Process the filled jars in a pressure canner at 10 pounds pressure for 1 hour 40 minutes. When the processing time is done, allow the pressure to return to 0, wait an additional 10 minutes, and then carefully open the canner lid. (Head to Chapter 9 for detailed processing instructions for pressure canning.)
5
Remove the hot jars with a jar lifter. Place the jars on a clean kitchen towel in a draft-free area. After the jars cool completely, test the seals (refer to Chapter 4). (If you find jars that haven’t sealed, immediately refrigerate them and use them within one week.) Boil the contents of each jar for 15 minutes before tasting or eating.
Per 4-ounce serving:
Calories 212 (From fat 85); Fat 9g (Saturated 2g); Cholesterol 83mg; Sodium 788mg; Carbohydrates 0g (Dietary fiber 0g); Protein 30g.

Including Meats in Other Canned Mixes
When thinking about your pantry contents, don’t forget to add a few canned dishes that contain both vegetables and meats. These complete meals in a jar not only taste better than convenience food you can buy in a store, but they’re also fresher and definitely more healthy.
Canning a soup or stew gives you a little more breathing room for experimentation. Because you are canning based on the meat — the item that needs to be pressurized the longest — any other vegetable will be safely canned right along with it. When you are designing these soups and stews for your family, you can easily substitute vegetables or add more of another veggie that your family especially enjoys.
Following are some pointers:
When using strongly flavored vegetables, remember a little goes a long way.
Strongly flavored veggies, like those in the Brassica family (cabbage, Brussels sprouts, broccoli, and cauliflower, for example) tend to have an even more pronounced flavor after canning. If you are adding any of these vegetables, use a light touch. You can add cabbage to any soup you make, for example, but add only about half the amount you add of the other vegetables.
Leave out the noodles or rice when canning.
Otherwise, your noodles end up overcooked and too soft. Rice seems to do fairly well; brown holds up better than white rice, but again it may become too soft for your family to enjoy.
Since you are going to bring the canned product to a boil for at least 15 minutes before eating, that’s the perfect time to add your noodles or rice. The noodles can cook as the canned ingredients heat.
When you open a can of homemade soup or stew, you may find that it’s thicker (in the case of the stew) or that the vegetables have gathered together at the bottom of the jar. This is harmless. After warming, it will thin and combine into the soup or stew you started out with. For recipes that combine meats and other ingredients, go to Chapter 12.
Chapter 12
Combining the Harvest: Soups, Sauces, and Beans
In This Chapter
Discovering the benefits of mixing your vegetables
Choosing a safe processing method
Loading your meals with flavor
Getting along with tomatoes
Mixing it up with beans
Recipes in This Chapter
Chicken Stock
Turkey Stock with Vegetables
Stewed Tomatoes with Celery
▶
Italian Style Tomatoes
Spaghetti Sauce with Meat
Baked Beans
Beans with Salt Pork
Not all canned foods are simply one ingredient. Canning combinations of foods gives you meals that are as fast and easy as store-bought heat-and-eat varieties. With a little bit of advanced planning during the growing season, you’ll keep your shelves stocked with a variety of meals for people on the go. In this chapter, you get tips for combining high- and low-acid foods into savory soups, delectable sauces, or hearty one-pot meals. After your family gets a whiff of the aroma coming out of the kitchen, they’ll think you’ve been slaving over the stove all day!
Whenever you combine low- and high-acid foods, as the recipes in this chapter do, always use pressure canning. For complete details on pressure canning, refer to Chapter 9.
The Lowdown on Canning Combined Foods
Pressure canning soups, sauces, and one-pot meals is the answer for healthy, quick meals without filling up your freezer. Pressure canning is a major timesaver in the long run: If you spend one day (or even a weekend) preparing soups, sauces, and other hearty meals, you can get a hot meal on the table in a flash and keep your freezer for ice cream and other treats!
But you have to think about more than which food combos go well together: You also have to know which processing method to use to safely preserve combined foods, which may contain both high- and low-acid foods.
Choosing a processing method
As we’ve mentioned elsewhere in this book, the only processing methods approved by the United States Department of Agriculture (USDA) for safely home-canning food are
Water-bath canning:
For canning high-acid foods (like fruit and tomatoes)
Pressure canning:
For canning low-acid foods (including vegetables and meat) and for canning high- and low-acid foods combined.
Mixing low-acid foods and high-acid foods
Knowing that a pot of chili or spaghetti sauce contains both high-acid and low-acid foods (the chili contains tomatoes and vegetables, and the spaghetti sauce contains meat, tomatoes, and vegetables), how do you determine which method is right while still ensuring a safe product? Follow this rule:
Whenever you combine low- and high-acid foods, process the food as though it were low-acid: Use the pressure-canning method. For the same reason, whenever you include meat, fish, poultry, or seafood in your canned product, use pressure canning. Pressure canning, explained in detail in Chapter 9, is the
only
safe processing method to use when combining low-acid and high-acid foods. (For detailed instructions for pressure canning meat, fish, poultry, or seafood, refer to Chapter 11.)
 Quite simply, adding low-acid foods to high-acids foods raises the acidity level of the food being processed above 4.6 pH (see Chapter 3), and the higher the acidity number, the less acidic a food is.
Mixing like foods with like
When you mix like foods with like (high-acid foods with other high-acid foods, for example, or low-acid foods with other low-acid foods), you process them in the manner suggested for their acidity level. Two high-acid fruits can be processed in a water-bath canner, and two low-acid foods can be pressure canned together. Always follow a recipe and make no changes.
Tips for a successful meal
Obviously, the most important thing to know about processing combined products is to use the right processing method (as explained in the preceding section). Beyond that, there are other things you can do to ensure a successful product and a delicious (and easy) meal, explained in the following sections.
Cut all ingredients uniformly to ensure even heating
Make sure all your fruits, vegetables, and meat pieces are as even as possible, the same as you would for regular stove cooking.
Use the longest processing time given when combining foods
For example, the processing time for corn alone in a 1-quart jar is 1 hour 25 minutes. The processing time for lima beans alone in a 1-quart jar is 50 minutes. Therefore, the correct processing time for combining corn and lima beans in a 1-quart jar is 1 hour 25 minutes.
Follow the recipe exactly
Don’t be tempted to add or adjust the ingredients in your recipe. Any variation changes the acidity level as well as the processing time (and sometimes the processing method) needed to destroy the microorganisms that cause botulism, the most serious form of food poisoning (refer to Chapter 3).
And always use the jar size recommended in your recipe. Some combination foods may be canned in either pints or quarts; other foods may be suited only for pints.
Don’t add uncooked pasta or rice to your food before canning your jars
While these are wonderful additions to soups, the intense heat of pressure canning disintegrates your pasta or rice. For example, if your pasta cooking time in boiling water is 8 to 10 minutes and you extended the period to 30 minutes or longer at a temperature higher than boiling water (as occurs in the pressure canner), you end up with something that doesn’t resemble pasta or rice. For best results when adding uncooked pasta or rice to your soup, do the following:
1. Complete the 15-minute boiling period for your canned food.
2. Add the pasta (or rice) to the boiling soup, cooking it for the time recommended on the package.
3. Test the pasta (or rice) for doneness.
Getting your meal on the table
After selecting a jar from your pantry, follow these simple steps for quick, timesaving meals:
1. Bring your canned food to a boil in a large pot, boiling the food for 15 minutes.
Don’t be tempted to taste your food until after the boiling period has elapsed.
2. Add your seasonings, such as salt, pepper, and fresh herbs.
3. Serve and enjoy!
Whenever you pressure-can, you
must
boil the contents of the jar for 15 minutes before tasting or eating. Refer to Chapter 3 for safety information.
Stocking Up on Soup
Soup is the ultimate comfort food. The road to great soup starts with a flavorful
stock,
which is water infused with the flavors of vegetables and/or the bones from beef, poultry, or fish. A
reduced stock
is boiled rapidly, thus reducing the amount of liquid by evaporation and producing an intense flavor.
Chicken Stock
You can either purchase chicken and reserve the meat for another use or use the parts you may not normally eat, such as the neck, the back, the wings, or the less-often used heart, liver, and gizzards. These pieces are packed with flavor, but using or not using them is up to you.
Preparation time:
2 hours
Processing time:
Pints, 20 minutes; quarts, 25 minutes
Pressure level:
10 pounds
Yield:
About 8 pints or 4 quarts
3 to 4 pounds chicken pieces
4 quarts water
2 stalks celery, leaves attached, cut into 1-inch pieces
2 medium onions, quartered
15 peppercorns
3 bay leaves
Salt, to taste
1
Combine the chicken and water in a 6- to 8-quart pot; bring the mixture to a boil over high heat. Add the celery, onions, peppercorns, bay leaves, and salt. Reduce the heat; simmer, covered, about 2 hours or until the chicken is tender. Remove from the heat; skim off any foam. Remove the chicken pieces, reserving the chicken for another use.
2
While the stock is simmering, prepare your canning jars and two-piece caps (lids and screw bands) according to the manufacturer’s instructions. Keep the jars and lids hot. (For information on preparing your jars, see Chapter 4.)