Sew What! Bags: 18 Pattern-Free Projects You Can Customize to Fit Your Needs (39 page)
Read Sew What! Bags: 18 Pattern-Free Projects You Can Customize to Fit Your Needs Online
Authors: Lexie Barnes

four tie strips (Note: Cut the strips wide enough to fold over and stitch the edges. For the caddy shown, we cut 2" wide strips.)
If you want to make pleated pockets, we’ll tell you how in a minute. But how do you figure out how much fabric to cut? It’s easy. Just add 2" to the width of each pleated pocket. Three pockets? Add 6" to the width. Don’t forget to also add 1" for two ½" seam allowances.
3.
MAKE THE TIES
. Make the ties as you would make straps (
see page
42
), and set them aside for now.
4.
MAKE THE INDIVIDUAL POCKETS
. Make pockets as instructed on pages 43–44. To finish pockets, you don’t need to press under the top edge of the pocket — just enclose it with double-fold bias tape (the narrower fold on top) and edgestitch. (
See page
46
.)
5.
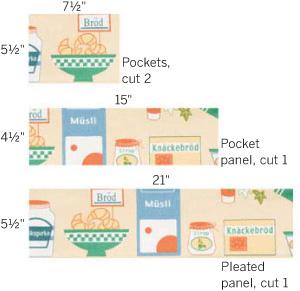
MAKE THE SIMPLE POCKET PANEL
. For a multipocket flat panel, like our middle row, first bind or hem the top edge as described in step 4. Press under the bottom edge ½". With right sides facing out, lay the panel on the front caddy piece where you’d like it to be. Stitch along the bottom of the panel to attach. Measure out desired sizes of pocket slots and stitch the dividing lines, backtacking at both ends. Machine-baste the pocket panel ¼" from both sides.

6.
MARK THE PLEATS
. To make the pleated panel, first attach bias tape to the top edge, as with the other pockets. Each pleat needs 1" of fabric, which will be folded in the middle, so plot out the stitching lines and fold lines as shown.
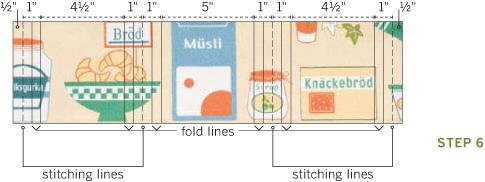
7.
ATTACH THE PLEATED PANEL
. With right sides facing out, place the pleated pocket panel on the front caddy piece, aligning the bottom edges. Press the folds of each pleat and stitch between the pockets on the stitching lines, backtacking at the top edge for reinforcement. Pin and machine-baste the pocket panel to the front of the caddy ¼" from the bottom and sides.

If you are placing your pleated pockets somewhere other than the bottom edge of the caddy, you’d need to turn under the bottom edge of the panel and stitch it in place.
8.
STITCH THE SIDES
. With right sides together, pin and stitch the back caddy panel to the front caddy panel along the sides and bottom, leaving the top open. Clip the corners, trim the seam allowance, and turn the caddy right side out. Press under the top raw edges ½" and press.

9.
ADD THE TIES
. Place the ties side by side, in pairs, about 2" from sides of caddy. Insert the ends into top edge. Pin and topstitch along the top edge to secure the ties, and edgestitch close the top of caddy. If you plan to put heavy items in your caddy, you may want to double-stitch the top edge for reinforcement.

If you prefer, you can attach loops instead of ties. Just make a loop and stitch the ends into the caddy the same way you would the ties.
CADDY-TO-GO
You can make a smaller version of the caddy to hang nicely on a hook or a doorknob. Take it with you from room to room. Or combine the caddy concept with a tote bag from
chapter 3
. Just put your pockets on the outside and presto! You’re ready to roll.

Creative Needle
800-443-3127
www.creativeneedlemag.com
Fiberarts
800-875-6208
www.fiberarts.com
Sew News
800-289-6397
www.sewnews.com
Sewing Savvy
800-449-0440
www.clotildessewingsavvy.com
Threads
Taunton Press
800-477-8727
www.taunton.com/threads