Muscle Medicine: The Revolutionary Approach to Maintaining, Strengthening, and Repairing Your Muscles and Joints (17 page)
Authors: Rob Destefano,Joseph Hooper
Tags: #Health & Fitness, #General, #Pain Management, #Healing, #Non-Fiction

Older patients can often be poor candidates for surgery. For them, and many other patients, a combination of manual and physical therapy and, when needed, corticosteroid injections, is a very effective approach to relieving symptoms. However, decompression surgeries of nerves entrapped due to stenosis directly address the cause of the symptoms and are probably some of the most effective and predictable spine surgeries.

NECK
We divide the neck into three treatment areas: the front, back, and sides (anterior, posterior, and lateral). The movements include flexion (bringing the chin to the chest), extension (chin to the ceiling), lateral flexion (ear to shoulder), rotation (chin toward shoulder), and some coupled movements (a combination of the previous movements). The neck has so many possibilities of movement because it is designed to aid the eyes in taking in as full a scope of vision as possible. Contact your health-care professional if numbness or tingling occurs in the upper extremities during any of the following self-treatment, stretches, or exercises.
ANTERIOR (FRONT) NECK MUSCLES
A. SCALENES
Purpose:
To target and remove restrictions and restore a full range of motion to the anterior neck muscles (especially the scalenes) by manually releasing tight, short, and damaged muscles.
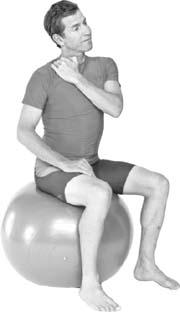
Starting out:
Sit on a stability ball or chair with your feet spread shoulders’ width apart. Flex your neck and tuck your chin. Hold your index and middle fingers together and place them on the front of the neck between your Adam’s apple and ear line. Your fingers should rest behind the large muscle running diagonally across the neck, the sternocleidomastoid (SCM).
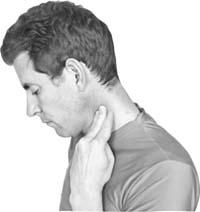
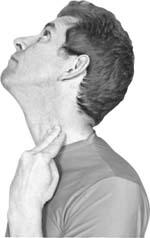
How to do it:
Press in and down slightly, as though trying to prevent someone from sliding a sheet of paper from under your fingers. Tilt your head back, look up, and extend the neck. Hold for a count of two. Repeat on the opposite side. Do two to three repetitions, releasing and moving your hand position from higher to lower each time.
Troubleshooting:
Don’t press too hard as this can irritate the muscles. Avoid putting too much pressure over the blood vessels of the neck. Avoid letting your skin slide under your fingers by using angled pressure. (See the “Angled Pressure” box on page 77.) Keep the stretch gentle—do not strain the muscle.
*Important:
Check with your doctor before attempting any work on your anterior neck, especially if you suffer from cardiovascular disease or “hardening” of the arteries (atherosclerosis).
B. STERNOCLEIDOMASTOID
Purpose:
To target and remove restrictions and restore a full range of motion to the anterior neck muscles (especially the SCM) by manually releasing tight, short, and damaged muscles.
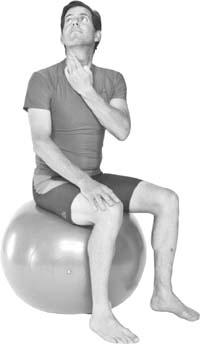
Starting out:
Sit on a stability ball or chair with your feet spread shoulders’ width apart. Turn from the chin and look down toward the opposite knee. Using the hand opposite to the treatment side, hold your index and middle fingers together and place them on the front of the neck between your Adam’s apple and ear line. Your fingers should rest on the big muscle of the neck (SCM).

How to do it:
Press in and down slightly, as though trying to prevent someone from sliding a sheet of paper from under your fingers. Turn the head toward the treatment side, looking up and past the treatment-side shoulder. There should be a stretch on the front of the neck, but not too much tension in the back. Hold for a count of two each time. Repeat on the opposite side. Do two to three repetitions, moving your hand position from the top of the muscle down toward the base.
Troubleshooting:
Don’t press too hard as this can irritate the muscle. Avoid putting too much pressure over the blood vessels of the neck. Avoid letting the skin slide under the fingers by using angled pressure.
POSTERIOR (BACK) NECK MUSCLES
Purpose:
To target and remove any restrictions and restore a full range of motion to the posterior neck muscles (cervical erector spinae, upper trapezius, and deep intrinsic muscles) by manually releasing tight, short, and damaged muscles. This is a real hot spot for anyone who works at a computer, studies, or suffers from headaches.
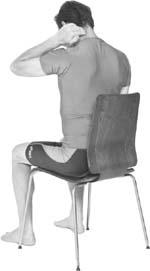
Starting out:
Sit on a stability ball or chair with your feet spread shoulders’ width apart. Keeping an upright posture, tilt your head back. Hold your index, middle, and ring fingers together and place the fingertips on the back of the neck. Find the spine and then move over about an inch onto the thick muscle.

How to do it:
Press in and down slightly so that the fingers don’t slide with the movement. Bring your head forward as though trying to gently hold a tennis ball under the chin. This should be a gentle movement held for a count of two. Repeat on the opposite side. Do two to three repetitions, releasing and moving your hand position from the top to the bottom of the neck each time.
Troubleshooting:
Avoid pressing too hard as this can irritate the muscles. Avoid letting the skin slide under the fingers by using angled pressure. Don’t collapse the neck back or forward, as it compresses the spine: keep an upright posture.
LATERAL (SIDE) NECK MUSCLES
Purpose:
To target and remove any restrictions and restore a full range of motion to side (lateral) muscles, especially in the upper trapezius by manually releasing tight, short, and damaged muscles of the lateral neck. These muscles are also a hot spot for those who spend their days in front of a computer or engage in manual labor.
Starting out:
Sit on a stability ball or chair with your feet spread shoulders’ width apart. Without letting your head bend forward or back, bring the treatment-side ear toward your shoulder. Find the bony bump behind the ear, bring your fingers behind it, and follow a line down to the base of the neck. Using the hand opposite to the treatment side, hold your index, middle, and ring fingers together and place the finger pads on the target area at the base of the lateral neck.
Apply tension to these three areas: the top of the muscle, especially at the base of the neck; just in front of that muscle; and just behind that muscle.